
The difference between image masking and clipping path lies in how each technique handles edges, transparency, and complex details. Understanding when to use masking versus clipping paths helps you achieve cleaner, more professional image results.
Clipping Path vs Masking: Master the Basics First
Before we go into the differences, let’s know the matters first. Well, you can know them on the procedure, but not enough. It is better to have a good idea of the matters we are dealing with. This is not only useful for our procedure but also for learning to implement it in professional work.
What is Clipping Path?
Clipping Paths are closed vector lines or shapes used to separate subjects from background images. This is a fundamental image editing technique that allows you to edit every part of the subject while keeping the background editable.
Clipping paths can be used for a variety of purposes, including:
- Clear the background for a distraction-free image
- Colors of the background can be changed or modified
- Isolated objects for marketing materials, catalogs, or online stores
- Work with multiple paths in Photoshop for complex images
For more insights, check out our detailed guide on the common uses of clipping paths in Photoshop.
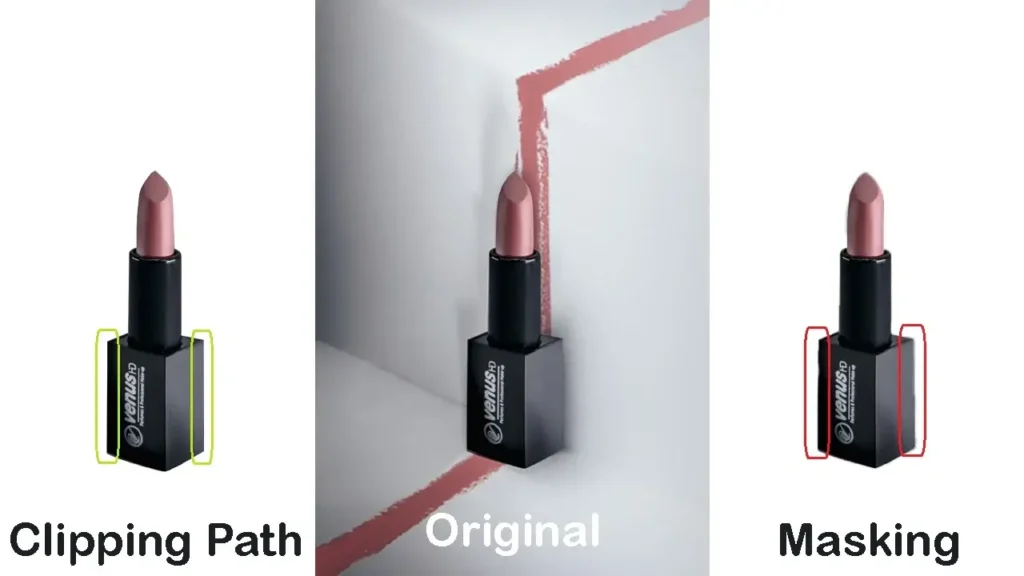
Pro Tip: Clipping Path is ideal for subjects with hard, defined edges. For soft or complex edges like hair or fur, consider using image masking (which we’ll cover next).
What is Masking?
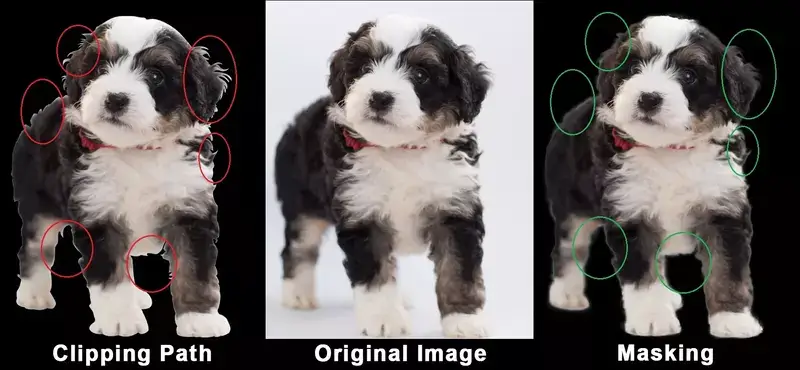
Masking is a non-destructive editing technique that hides or reveals parts of an image. For hair, fur, smoke, or transparent objects, masking is superior to the Clipping Path.
With masking, you can:
- Keep the original image while hiding unwanted areas
- Access hidden parts whenever you want
- Create advanced compositions with layers
- Keep details like hair or semi-transparent objects in place
Pro Tip: In images containing both hard and soft edges, use Clipping Path first to perfect the hard areas, then apply Masking to perfect the soft details.
Differences Between Clipping Path vs Image Masking
There are several differences between the Clipping Path and the Masking. Both do a similar type of editing in the image, but in a different way. The reasons for the necessity of both processes are actually the subject. Also, it is related to the image category and the convenience of working.
Let’s know the differences between them.
1. Edge of The Subject
You can use the Clipping Path for the subjects with hard edges. Image editing with Clipping Path is convenient for this kind of subject. You can easily create a path and make a selection. Masking is not good for the kind. Why? Because the selection of the subject with the mask will take more time and labor. As a result, the final output will be inappropriate and not satisfactory.
On the other hand, subjects with soft and thin edges are good to handle with image masking. If you use a clipping path, you may cut out the subject, but you will lose the details. So, to retain softness, there is no alternative to Masking. However, you can use a clipping path and then mask in some images for convenience, but that is another option.
2. Destructive and Non-destructive
With the help of the Pen Tool, the Clipping path is good for basic or simple-shaped subjects. But the action is destructive. If you make the path, make a selection, and cut it out from the image, you cannot go back to the previous form. Well, there is an option of editing the points, but still, it is destructive.
As for Masking, you can handle complex, compound, and super-complex subjects. It is a non-destructive editing method. That means you can go back to any step and reveal any part you want.
3. Compatibility
Compatibility is a very important matter separating the subject from an image. Depending on the subject type, you should select the procedure with expertise. For a few images, it is hard to say which one is more effective, the Clipping Path or the Masking.
Sometimes you may have a subject that has soft edges and hard edges. In that case, the Clipping Path and the Masking are compatible.
Clipping Path is for the hard part, and Masking is for the soft parts. Using the Clipping Path at the beginning is better. Masking is better in the end because it is at another level. You can name this clipping mask.
If you mask first and clip later, the procedure will be wrong, and you may need to do the masking again. As a result, you may waste time and labor. Clipping Mask Photoshop CC 2019 is amazing for its purpose.
4. Image Type
From the very beginning, we mention the term ‘Image type’, which is the primary focus. The subject of the image may be sharp-edged, soft-edged, a solid color background, or a multicolored background. If the subject is hard-edged, it is not really a calculating matter whether the background is solid colored or busy.
Here, busy means textures that contain multiple colors, opacity, softness, and hardness. Clipping Path is the best way to separate a hard-edged subject from any image.
On the other hand, if the subject has soft edges and the background is busy, Masking is a must. You cannot cut out these kinds of subjects from the background properly with the Clipping Path method. It will look unnatural. Here, image masking techniques are mandatory. You need masking that can give you a satisfactory result.
5. Harshness and Smoothness

Clipping Path is the process made by the Vector paths. And that also means the edges are hard and sharp. Not all subjects need soft or thin edges. For example, product images often require sharp edges to give a good look. However, some products contain thin edges, and masking is the best way to get the original view.
For the subjects, whether they are products or models, you cannot handle thin edges by the Clipping Path. They need Masking. Well, most of the time, model images are the potential for the process. We cannot leave one and do everything with another. Both are important in their own right.
6. Time Consumption

Time is valuable in human life. For the image editing task, it is more crucial. You cannot take as much time as you need for editing. Also, it will hamper productivity and, in the end, lose with the project. So, it is very important to choose the editing method carefully.
Never try to force one method to meet another one. When you need the Clipping Path method, you should not try Masking. The same thing is applicable to the other way. For the images that require both methods, go for the Clipping Path first and Masking later. Because it is better this way.
Comparison Table on Image Masking and Clipping Path
| Feature | Clipping Path | Image Masking |
| Best for | Hard edges | Soft edges |
| Tool | Pen Tool | Layer Mask |
| Transparency | No | Yes |
| Use Case | Products | Hair, fur |
Not sure which technique fits your images? Our experts can help—try our free sample to see the difference.
Conclusion | Clipping Path vs Image Masking
Both Clipping Path and Image Masking are essential tools in professional image editing. The key is to choose the right method based on your image’s subject:
- Use Clipping Path for hard-edged objects and precise cutouts.
- Use Masking for soft edges, complex details, or delicate subjects like hair and fur.
By understanding their strengths, you can save time, maintain image quality, and achieve flawless results. For high-volume or professional editing, consider trusted clipping path services like Clipping World to ensure consistency and precision.
Pro Tip: Practice both techniques and know when to combine them—Clipping Path first for hard edges, then Masking for soft details. Mastery comes with experience and careful application.
FAQs | Image Masking and Clipping Path
If the subject has hard and sharp edges, you should use the Clipping Path. On the other hand, if the subject is with soft edges, Masking is the best policy.
The only similarity between the Clipping Path and the Masking is the subject. Both methods we use to separate the subject from the background. You can also say, this is the main purpose.
You can use the Clipping Path as the Pre-Masking for the subject if necessary. When you make the selection with the Clipping Path, mark some more areas outside of the edge. Later, you can add a mask and go for the Masking procedure.