
Photo editing methods have gone too far that could be used to make the impossible possible. Nevertheless, converting or turning a form into another is truly magical and can give you a taste of uniqueness. Right now we are about to discuss the way to turn a photo into a sketch in Photoshop.
Adobe Corporation has made things so simple and handy that you can only imagine. However, this tutorial of ours will help you to understand all of the steps to create your own sketch from any photo. The whole operation may seem long and difficult but they are actually simple line drawing and short if you do it practically.
A Brief On Photo Into Sketch
The year 1685 was a remarkable time when the assumption of a portable camera was made. In 1816, the very first camera was used but before that people had to depend on huge-sized cameras for photography. Pencil picture was also a remarkable part of that time’s portrayal.
“Turn picture into sketch” is the advanced operation of this age. The very first cameras were large enough to contain one or more persons inside, and they subsequently evolved into smaller and smaller variants. The very first cameras were large enough to contain one or more persons inside.
Today, in this information age, when we have advanced shooting gears to capture the most realistic and perfectly digitized photos, the classic sketch look returns that require turning a photo into a ketch. And, this is the artistic form of any portrait or photograph to have the feel of the combination of advanced and ancient age.
Step By Step Process To Turn Photo Into Sketch
With the help of Photoshop and some useful steps, we are able to perform the conversion to turn a picture into a drawing or similar. However, this is not the only way and there is no standardization issue that how far you should go or how you like the sketch. You can stop at any point where you feel OK. Or, you can go through the whole operation and follow till the end. We recommend you complete the tutorial. Who knows, you may like the last segment of the operation!
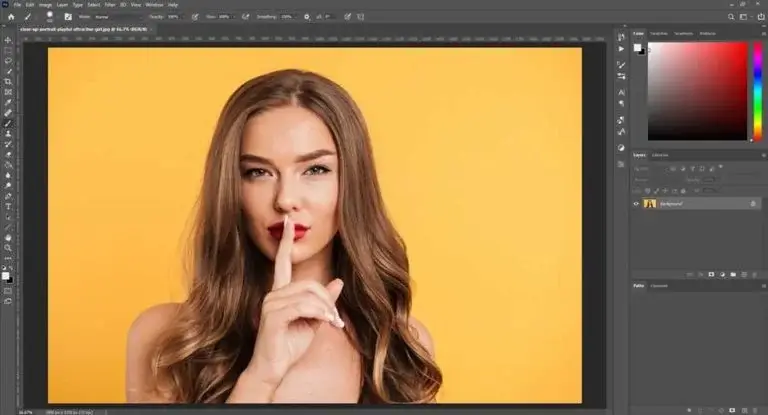
In order to convert photos to drawings, we are using a photo that was downloaded from the renowned free stock photo website ‘freepik.com’. We have a beautiful girl with brownish-golden hair and an amazing expression. The image is over a solid colored background but that is not a fact. To make things easy to understand we are using the background. You can use any image you like after learning the technique.

Step 1: Opening the Photo in Photoshop
The very first thing you need to do is open Photoshop and load the image in that. The process is simple. Go to your explorer (Win) or finder (MAC) and click and drag the image over the Photoshop from the taskbar. You can also go to the Photoshop menu File>Open and browse your image from your local disk. We are using Photoshop CC2021 for this tutorial. You can use any closer version but not older than Photoshop CC2018.
Step 2: Create a Copy of the Photo
It is pretty obvious to keep a copy intact so that the original image does not get damaged by accident. You may make unwanted changes and save that on the original photo. However, Photoshop contains several options to get back to the original but that could be painful for you. And, if you do not know the procedure to go back, that would be a mess.
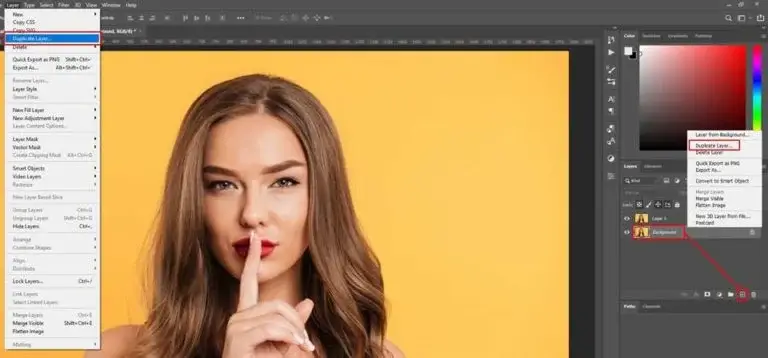
The best way to create a copy of the photo is the keyboard command Ctrl/Command+J for Win/MAC. Or, you can click and drag the layer over the new layer icon and Photoshop will do the rest. Also, you can right-click on the background layer and select ‘Duplicate Layer’. The same option is available in the Photoshop menu Layer>Duplicate Layer.
Step 3: Desaturation
As we have made a duplicate layer, the original layer can stay idle. Click on the copy layer and desaturate it at this point. Well, why do we need to desaturate it? Because we are about to create a pencil sketch of the photo and pencils do not contain any color sketch. The best way to desaturate is using the keyboard command Ctrl/Comman+Shift+U for Win/MAC.
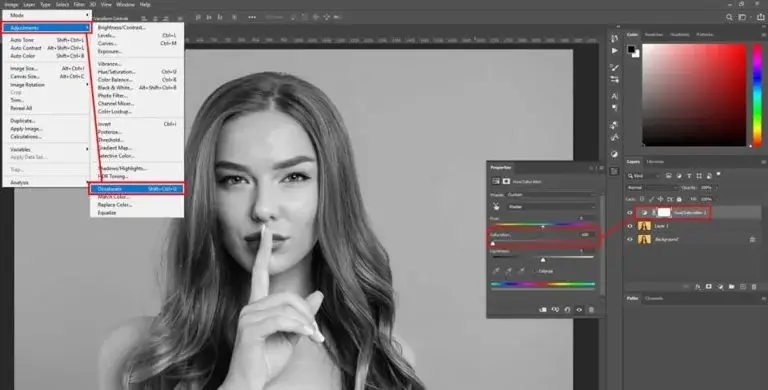
You can also go to the Photoshop menu Image>Adjustments> Desaturate. Both ways you can take away all the colors present in the canvas. Also, there is another way with the help of the Hue/Saturation adjustment layer, the one we are using here. Just add this over the duplicated image layer and take the Saturation slider all the way to the left.
Step 4: Vanishing the photo
“Let’s vanish” is the famous movie dialogue from the MCU motion picture ‘Avengers’. We are also doing a similar touchup with the photo for the time being. Well, vanishing is important to take control of the pixels we are using for the sketch creation in Photoshop. So, we are using the keyboard command Ctrl/Command+I for Win/MAC to invert the image.
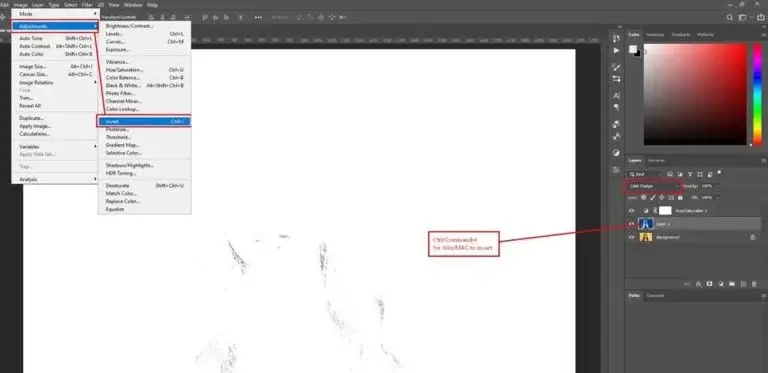
You can also go to the Photoshop menu Image>Adjustments>Invert and you will have the same. However, the keyboard shortcut is commonly used by professionals for convenience. Now, change the Blend Mode from Normal to Color Dodge to Linear Dodge. They do similar vanishing but for the time being, we are proceeding with Color Dodge.
Step 5: Gaussian Blur
As we have removed the image by the previous operation or step, it is time to reveal the details once and for all. For that, we are using the Gaussian Blur where the number of pixels determines the visibility and the primary recognition of a sketch. You can call this the basement of the prime objective.
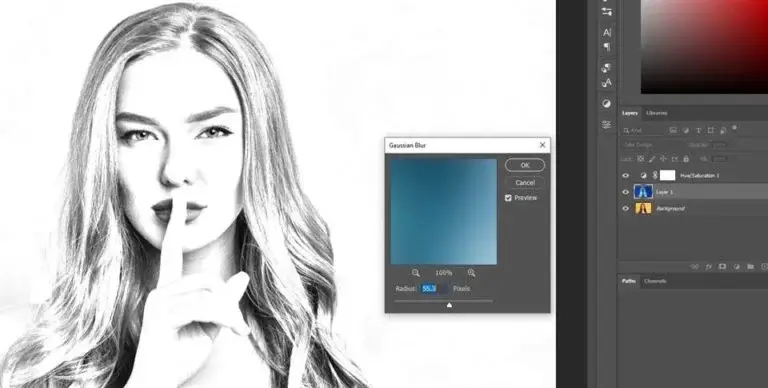
We have mentioned that there is no standard for the amount you use for the sketch creation. We are using a Radius amount of 55.3 pixels which seems better. You can choose more or less if that pleases you. However, avoid using too high or too low as that may not be resembling a smart appearance. Press OK to apply and process to the next step.
Step 6: Decreasing Brightness
You will find the image too light and bright it needs to be fixed at this level. So, we are going to use the Levels Adjustment layer and decrease the brightness just a little bit. Remember, decreasing the brightness enough may be unnatural and could take away the artistic form of the image subject.
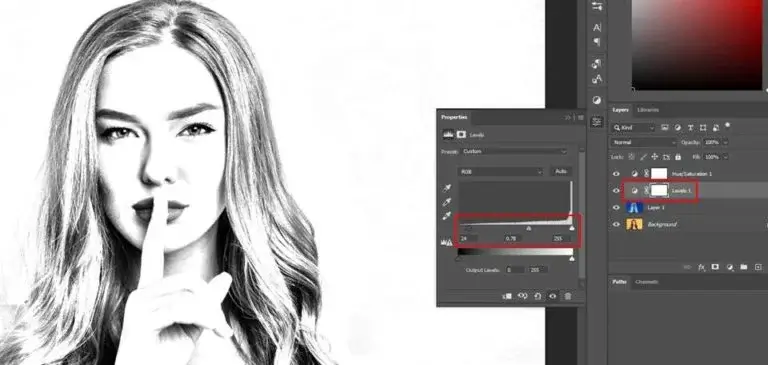
Add a Levels Adjustment Layer from “Create new fill or adjustment layer” and move the sliders as visualized in the above image. Keep the adjustments within the limit so that it does not get too dark on the canvas. Well, you can use the Curves Adjustment Layer to do the same. There will not be much difference between any one of these you use. We see the adjustment is good enough and not go any further.
Step 7: Brightness & Contrast Adjustments
The Brightness & Contrast of a sketch could be one of the most important matters that you should take care of. If the brightness is high, you cannot highlight the details of the sketch. On the other hand, if the brightness is low, the sketch may look dull and gloomy. So, simply add a Brightness / Contrast adjustment layer from the same place where other adjustment layers are present.
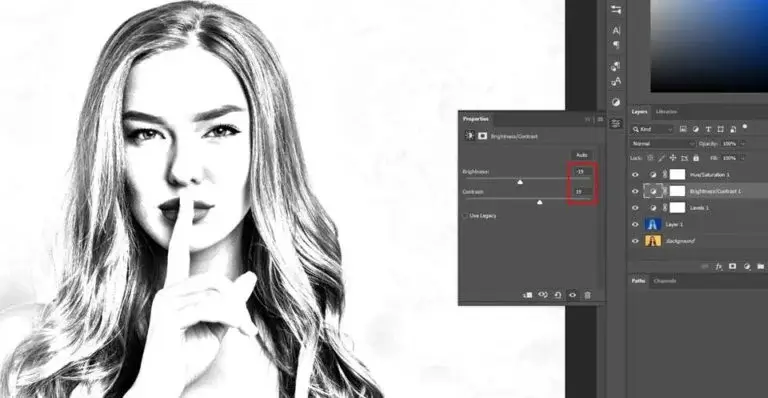
We believe that you already know the place and if you do not know that, go back to the previous step to find out more about it. Here, we will decrease the Brightness a little bit and increase the Contrast a little as well. You can choose any amount you like. Just make sure not to exaggerate anything.
Step 8: Merging All The Layers Into One
At this stage, we need to merge all the layers that we have created till now. Merging is important for various reasons from keeping the changes intact to further enhancements without harming other layers. Well, this is just an additional option where the layers we have created before will remain below the merged layer. So, there is no chance of losing them so you might want to make some changes.
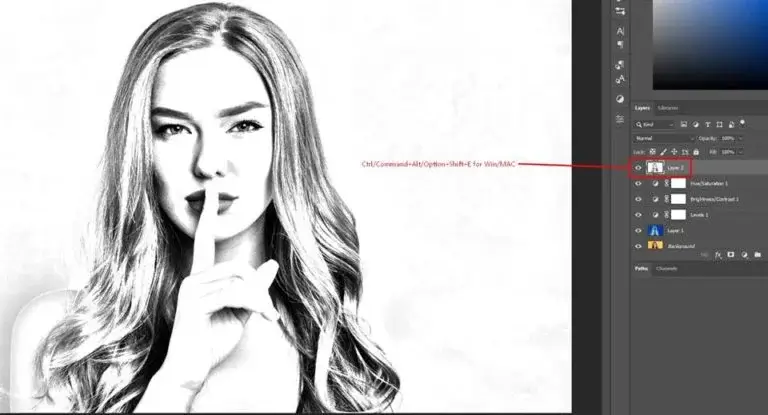
All you need to do is select the topmost layer from the layers panel. Use Ctrl/Command + Alt/Option + Shift + E for Win/MAC and you will have a new layer containing all the characteristics you have applied. However, you cannot make changes like the layers below that but, you can definitely delete this layer, make changes to the below layers, and merge all of them again.
Step 9: Smart Object Making to Turn Photo into Sketch
A smart object is an option that Photoshop provides in order to keep the details of a layer intact. So, whether you resize the layer to a smaller object, apply that, and go back, the details remain safe. Well, if you enlarge the object, it will lose details as the pixels are limited to the original size only.
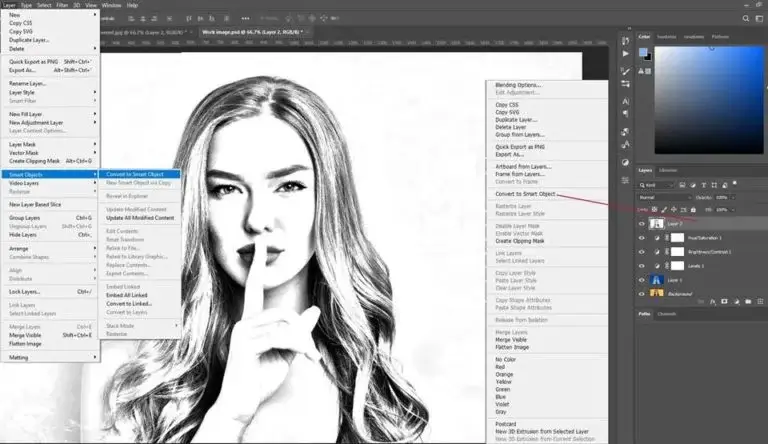
As we are explaining things more precisely by mentioning all the options available, why not for this one? Pity, there is no shortcut for creating a smart object. However, you can right-click on the layer and select “Convert to Smart Object”. Or, you can go to Photoshop menu Layer>Smart Objects>Convert to Smart Object to do the same.
Step 10: Addition Of Noise
Now it is time to add some noise to create a realistic sketch so far. The smart objects allow us to work non-destructively with the availability of making changes if required. So, before we add noise, it is important. To make changes to the noise value, just double-click on the Noise layer and you will have the box to edit.
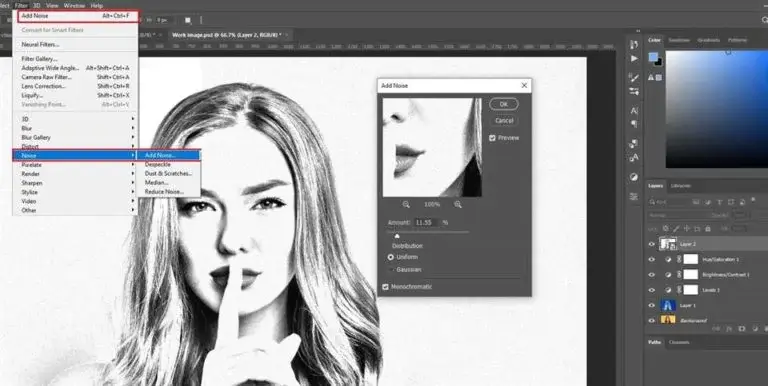
To add noise, simply go to Photoshop menu Filter>Noise>Add Noise. Also, you can select the first option of the Filter menu where you will see “Add Noise” directly. Well, there is another option that is the keyboard shortcut Ctrl/Command + Alt/Option + F to do the same. We are choosing a value that matches the best for our image. You can choose a different value if you like.
Step 11: Sharpen Filter
Now, you need to sharpen the image a little bit where the noise along with other pixels may look more clear and significant. More like, this option will make the presentation a little ironic. However, here also, you should not randomly change the values as this may be disastrous. But, don’t worry, there is still the undo option.
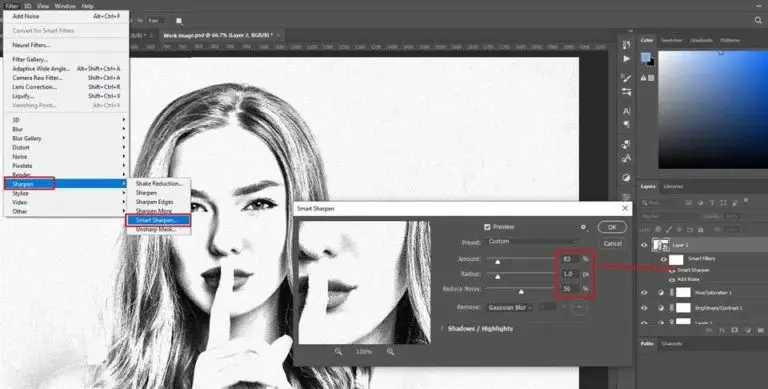
We are making a few changes here and not too much. If you look closely, you will find the Sharpening layer is under the Smart Filters and can be modified later. So, if you think that you may need to tune up the slider later, no problem. It is accessible at the point where you left.
Step 12: Merging All The Layers Into One Again
Now we will merge all the layers into one once again. I believe, you already know the shortcut for both Windows operating system and MAC. so, there won’t be a problem. Still, if you forget that by chance, go back to “Step 8: Merging All The Layers Into One” and follow that to implement.
Step 13: Poster Edges
We are close to the end but one important task is still pending. And, that is the posterization effect on the image. Well, this is very important to create some harsh and impure effects so that you may find this as it is created not edited. However, if you like the smoother effects of the canvas, this won’t be necessary and you can stop at this point.
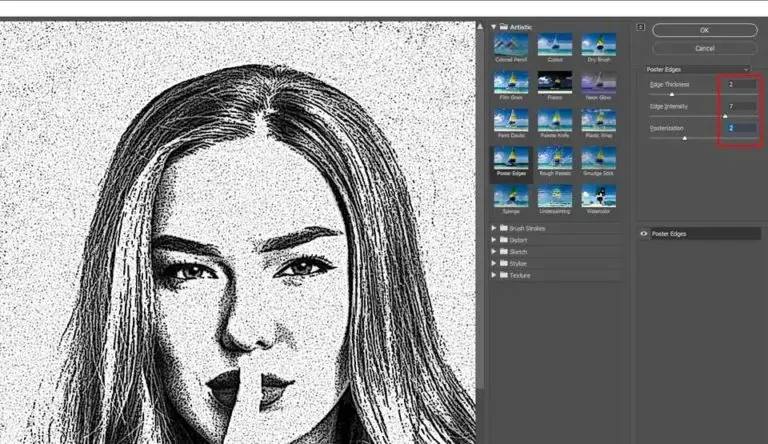
To apply the poster effect, go to the Photoshop menu Filter>Filter Gallary and you will reach another window where a variety of effects is present. Choose “Poster Edges” and change the values with the help of the sliders or putting numbers. We are using some values for our image that may look catchy.
Step 14: Turn the Photo into Sketch Masking
Masking is one amazing feature of Photoshop to show and hide areas in a photo. This option is also usable in new fill and adjustment layers. We will mask the image here to hide some areas and show some. So, we have added a mask and taken the brush tool with the foreground color black.
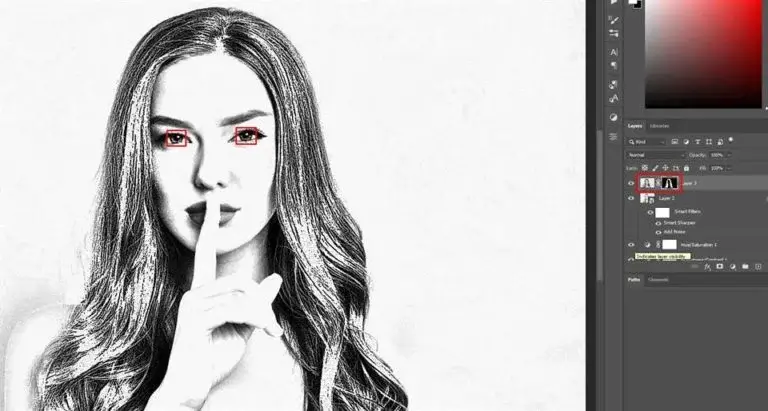
The Flow and Opacity should be 100%. We are brushing over the whole canvas except for the hair and pupils of the eyes. The reason is, that if you make that smooth, that won’t represent an artistic form of the image. However, leaving them as it does not mean good enough as it is your choice. We are mentioning the steps to make the sketch more artistic.
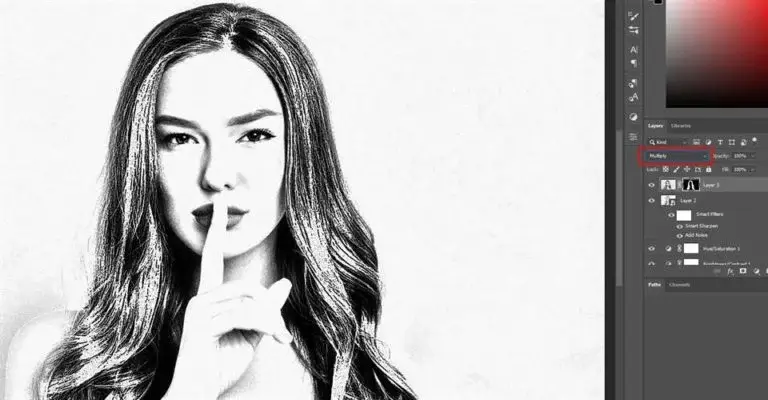
Step 15: Changing the Blend Mode
You can change the Blend Mode to make the sketch more natural. Well, this is not mandatory as the view is already looking amazing. Still, this option can make the portrait a little darker. So, change the Blend mode from Normal to Overlay. You can choose other options that seem the best for your image. Make sure to choose one of the darker blend modes because naturally, sketches are dark and not bright.
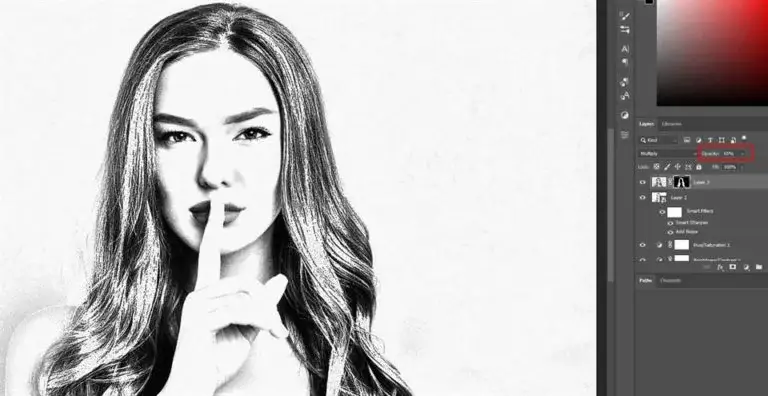
Step 16: Turn the Photo into a Sketch Finalizing
We are done with the process. There is actually nothing more to highlight. But, you can decrease the opacity of the image a little bit to reduce extra harsh effects. Simply, select the layer that contains the mask and decrease the opacity to 50-60% or the much you feel better. We are using 65% opacity for this image and that looks great.
Compendium
Turning a photo into a sketch that may look like it was created by pencil and the hand of an artist. The original art form is truly expensive if you hire someone to create a sketch of you. Moreover, you cannot move a bit while creating the piece of sketch otherwise the impression could be disastrous. In this busy life, it is too difficult to free some of your time for the artistic sketch.
Read Our Latest Articles
- How To Download and Install GIMP Software
- 11 Best 3-Point Slinger for Camera
- 61+ HD & Free Aesthetic Wallpapers for Professionals
Frequently Asked Questions
You need to select the line tool from the tools panel and click and drag on the canvas to draw a line. As this is a vector line, you can modify it anytime you want without losing details. Also, you can make it large, or thick, or rotate it as you want. One mentionable part is if you want to erase or divide the line, you need to rasterize it first.
How to outline the subject of an image in Photoshop should be more appropriate because you cannot see the difference if you outline an image. So, you need to isolate a subject, go to the layer style, and select ‘Outer Glow’. Here you can make the outline and modify that at will. Make sure to press OK to apply otherwise you may lose any modifications.
You can use Ctrl/Command+Shift+U for Win/MAC to desaturate an image instantly. This will take away all the colors present and make your image black and white. Or, you can take the Hue/Saturation Adjustment layer over your image layer and input the Saturation value ‘0’. Also, you can go to the Photoshop menu Image>Adjustments>Desaturate for the same.