Creating a Photoshop action is simple and effective. Adobe defines an action as a sequence of tasks executed on one or multiple files, including commands, options, and tool actions. Photoshop Action creation and implementation are convenient for image editing.
But you need to understand some matters to have a successful set of actions. Creating an action should be smart so that it does not fail to give you satisfactory results. We will try to give a clear concept in this tutorial.
The Process | Create Actions in Photoshop
Not all post-processing services contain the same attributes. This is quite different from other image editing tasks. To create an action in Photoshop, you need to open the ‘Actions’ window.
If you see it already visible in the Photoshop program, that is good. But, if you do not see it yet, go to Window>Actions and click on that. However, there is another way to open the Photoshop actions panel. Use shortcut Alt+F9 for Win or Option+F9 for MAC to show or hide the window.
I am using an 8-bit image for this action creation. We have already created a new action folder named CW Actions. To create a new action, click on the icon marked 2. A new window will open named ‘New Action’. Type the name you want to set for the action and click ‘Record’.
A Photoshop action functions similarly to a tape recorder—it records steps, not duration. The difference is that the tape recorder keeps recording until you pause or stop it. On the other hand, the Photoshop action will record only the activities you do. It does not matter how much time you spend on a step.
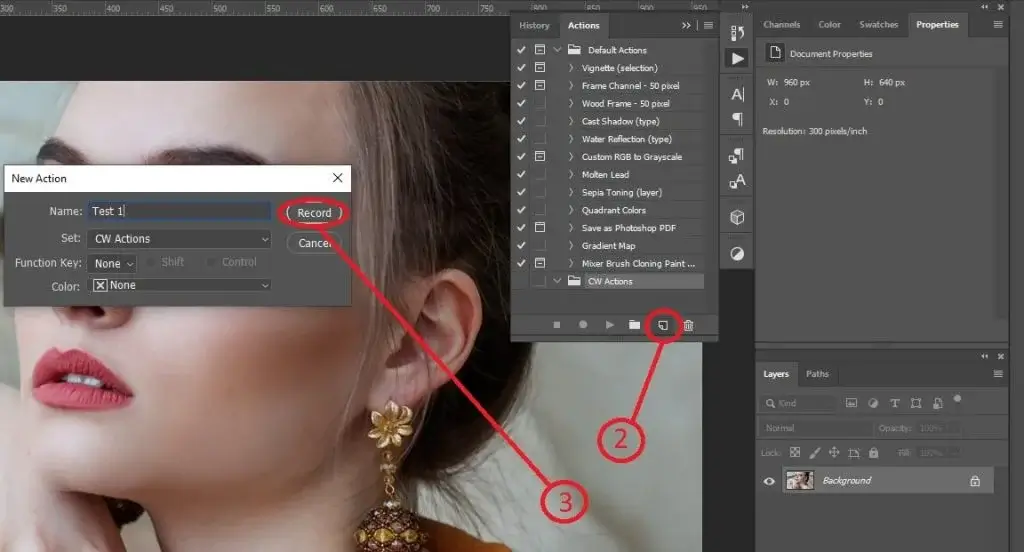
We will give you two examples in this blog. The ways we are about to discuss here are tests only. You can use them if you want. But it would be better if you learn the procedure and create your own for implementation.
Example 1 | How to Create Actions in Photoshop
Step 01: Copy The Background Layer
We are now creating an action named ‘Test 1’. The recording is running, and we are about to start the activity. First, we duplicate the layer and hide the background layer. This is safe for photo editing.
Suppose you’re working on the background layer. And, in the middle of the work, you realize that the retouching you have done was not appropriate.
In this situation, you need to start over again. But if you had kept the background layer safe, you could just make another copy and work on that. By the way, image retouching over the background layer is not a good idea.
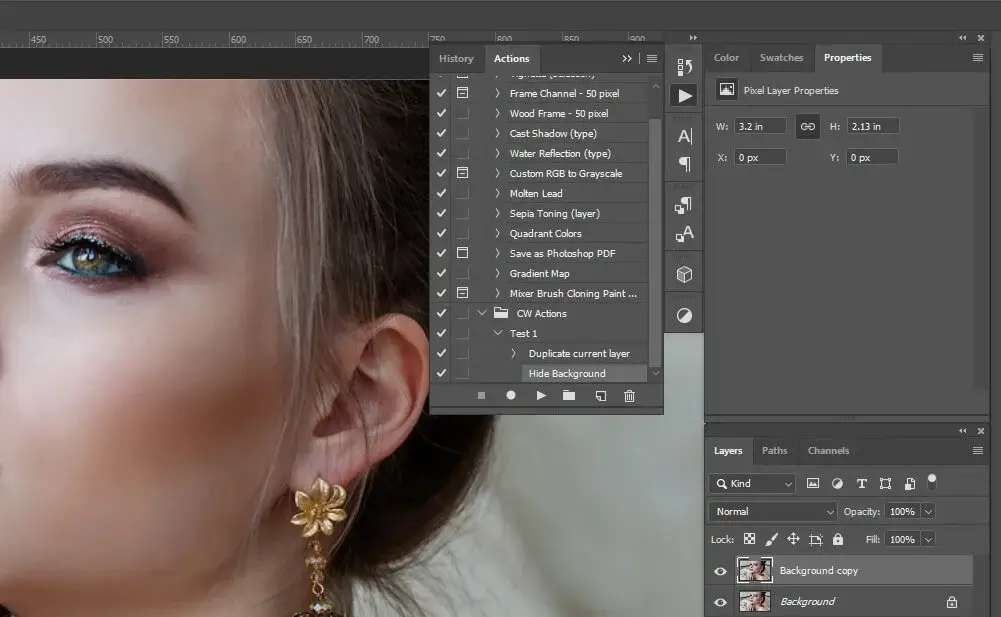
Step 02: Convert Into a Smart Object
Now, we will rename the layer as Test 1. Renaming the layer is optional and does not affect the action’s performance. Then, we are converting the Test 1 layer into a smart object. To convert an image into a smart object, you need to go to Filters>Convert for Smart Filters.
A dialogue box will open with the message, “To enable re-editable smart filters, the selected layer will be converted into a smart object”. Hit ‘OK’ to confirm.
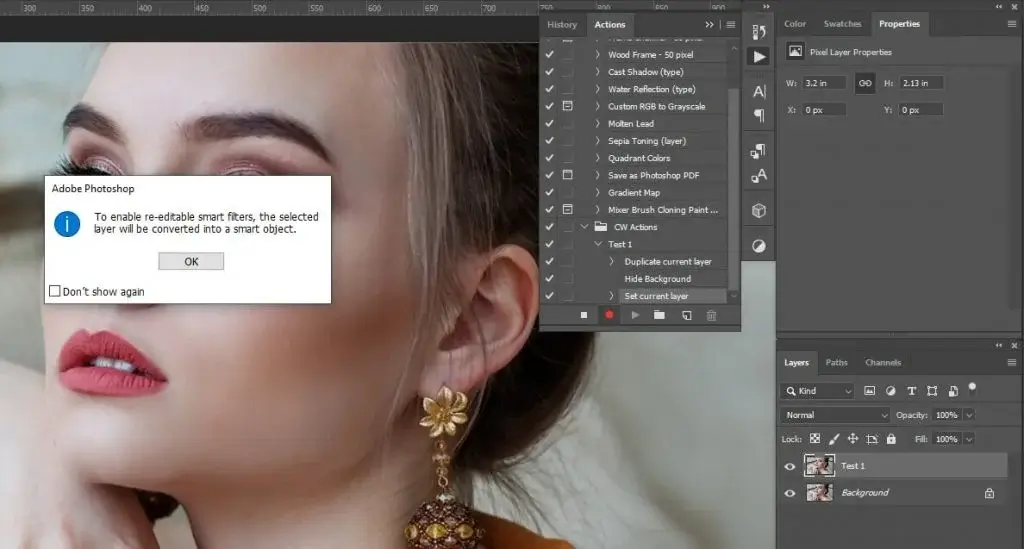
Also, you can do the same by right-clicking on the layer and selecting ‘Convert to Smart Object’. The way you want to follow is completely your choice.
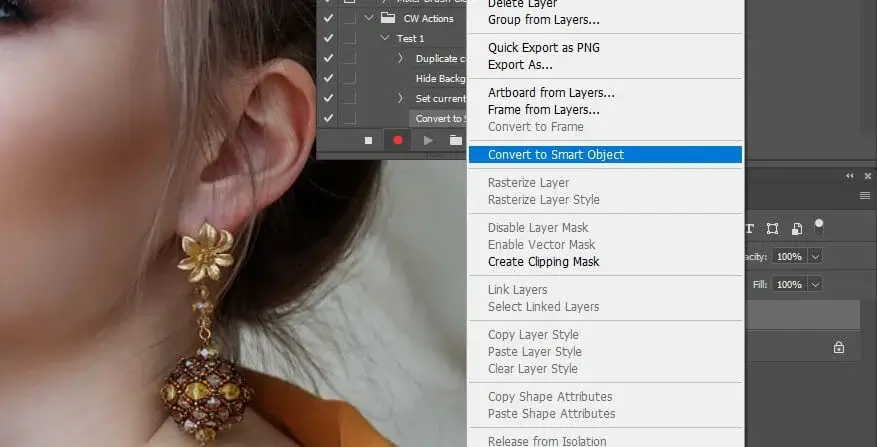
Step 03: Adjustment Layers | Photoshop Action Panel
Next, we add a solid color adjustment layer in black and reduce the opacity to 50%. Also, we are changing the blend mode from normal to ‘Soft light’.

Now, we add a Brightness/Contrast adjustment layer and move the sliders a little bit. As we are doing these for test purposes of the action creation, we may not be perfect. But you make sure to use the best view of the action you want to take. Everything we are doing is variable. So, you can change the values anytime you want.
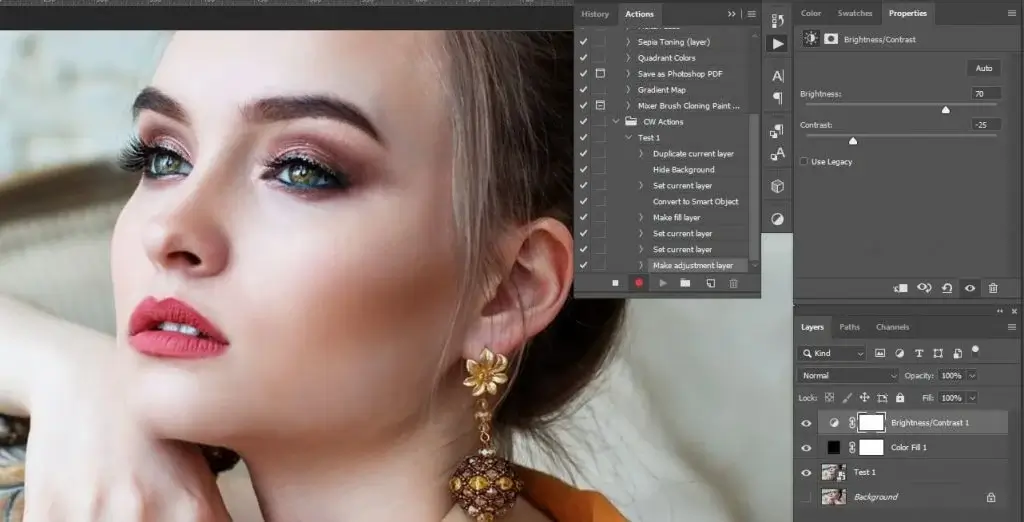
Next, we add a ‘Levels’ adjustment layer and change the values a bit.

Step 04: Color Lookup Layer | Photoshop Action
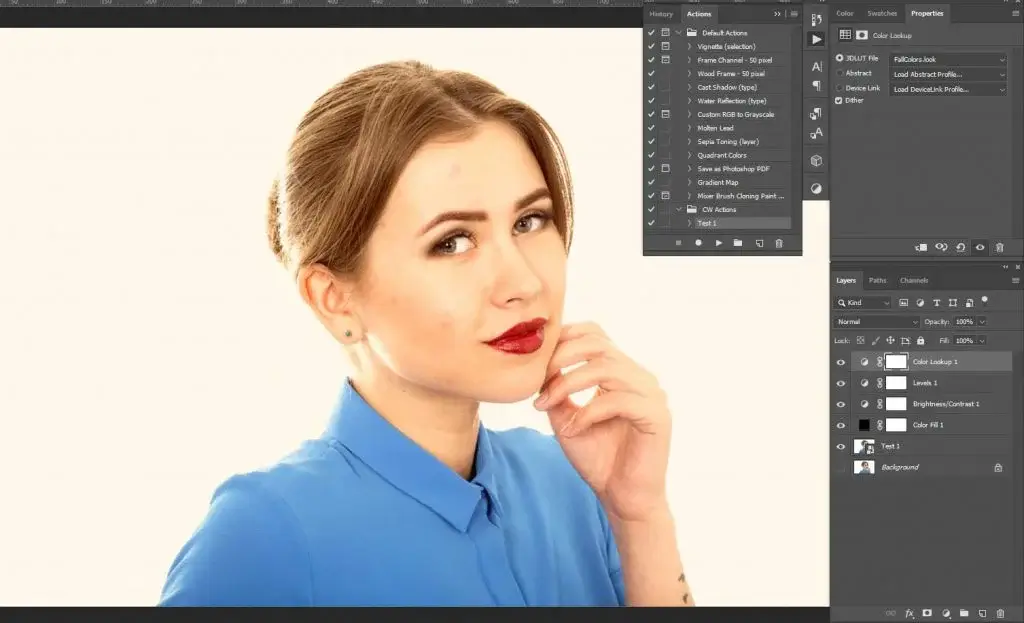
At last, we add a ‘Color Lookup’ adjustment layer and change the 3DLut File to ‘Fall colors. look’. The effect gives an image a warm outlook. You can have enough effects in the color lookup table. Choose according to your needs.

We stop recording at this point. Action creation is done now. We created the action under the ‘CW Actions’ folder. And, we can add more actions to that, too.

Step 05: Action Test | Photoshop Action Guide
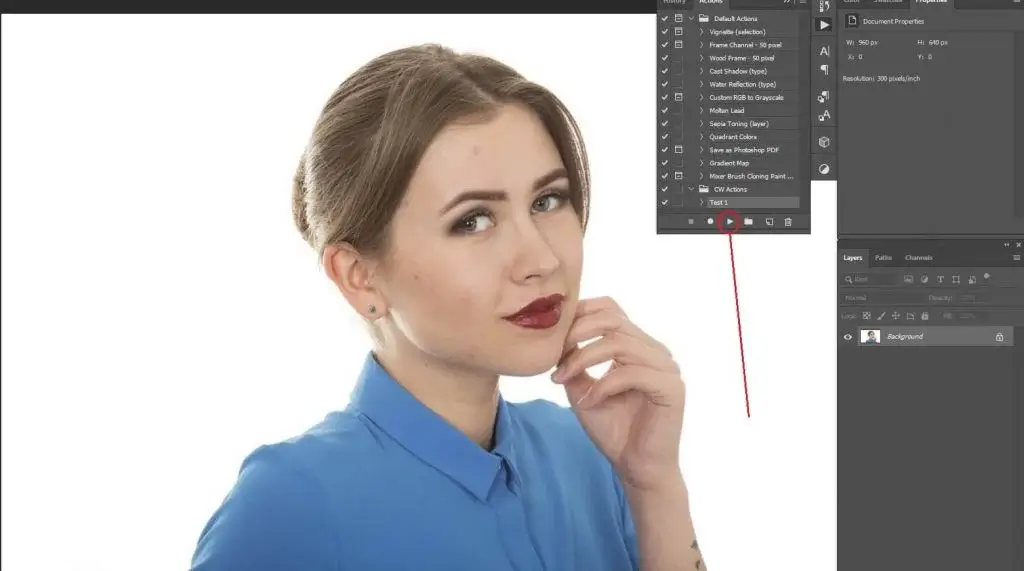
To test whether the action works or not, we take another image. The image we use for testing the action is below. Now, we press the play button (see image below) to see whether it works or not.
As we press the play button from the Actions by selecting the action, the result is as below. So, the action is working properly. You do not need to play the Photoshop action step by step. You can also try creating an action following ours.
Example 2 | How to Create Actions in Photoshop
In our second example, we’ll briefly walk through the steps. I hope you have already got the points on how to create an action in Photoshop. You have heard of the ‘Frequency separation’ Photoshop action, but how to make it? Here, we will give you the steps to follow along. I am pretty sure you can do that without any effort. So, let’s jump into it.
Open the Actions window. I will create a new action set named ‘Frequency Separation’. In the set, we will create two Frequency Separation Actions. One for 8-bit images and another for 16-bit images. Frequency Separation settings for 8-bit and 16-bit are different.
So, we will show you both. Before you start recording, be sure about the image bit. Go to Image>Mode and check for the bit selection. If the image is 8-bit, you will see the tick mark beside ‘8 bits/Channel’. If the image is 16-bit, you will see the tick mark beside ‘16 bits/Channel’.
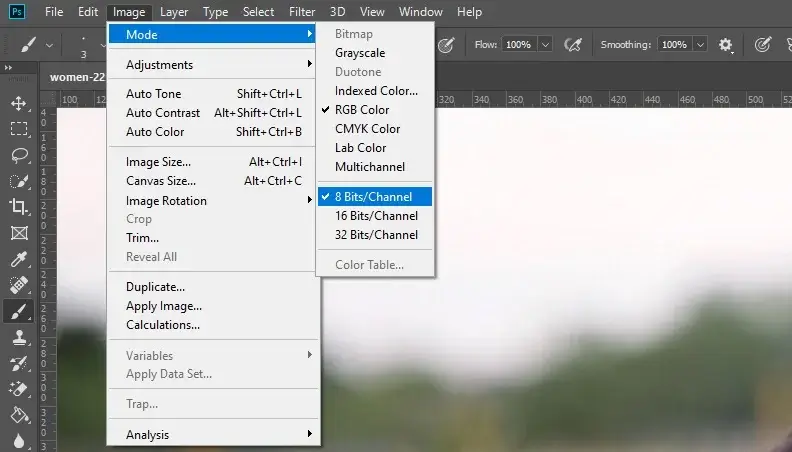
Create a new action, rename it FS-8bit (for 8-bit images) or FS-16bit (for 16-bit images), and hit ‘Record’.
Step 01 – Photoshop Frequency
Copy the background layer twice. After that, rename the uppermost copy as ‘High Frequency’ and the second layer as ‘Low Frequency’. Then select the ‘Low Frequency’ layer and hide other layers
Step 02 – Gaussian Blur
Go to Filter>Blur>Gaussian Blur. For the image, I am using a 2-pixel Radius. Also, I am selecting the stop box beside the Gaussian Blur in the action panel. And I am creating a stop above this with a message. “Do you want to adjust the Gaussian Blur”?

Step 03 – Radius in Gaussian Blur
When you use the Photoshop Action Panel, you need to press ‘Continue’ to set the Radius in Gaussian Blur. This radius removes the texture, leaving behind only the color information.

Step 04 – Apply Image Photoshop
Make visible the High-Frequency layer and select it. Go to Image>Apply Image. Set the Layer: Low Frequency, Blending: Subtract, Scale: 2, Offset: 128, and press OK. You will see the texture only without the color. You can use another option, and that is ‘High-Pass’. For this tutorial, we will not go for that because that requires a lot of expertise and experience.

Step 05 – Change the Blend Mode
Change the Blend mode from Normal to ‘Linear Light’.

Step 06 – Stop Recording
Make a group of high-frequency and Low-Frequency layers. Rename the layer FS – 8bit. Stop recording.

Step 07 – Frequency Separation
To make Frequency Separation 16-bit, except for one, all other activities are the same as 8-bit. But the settings for the Apply image are different. Set the Layer: Low Frequency, Blending: Add, Scale: 2, Offset: 0, check the box ‘Invert’ and press OK. That’s it.

For your convenience, in the end, make a group of the high-frequency and Low-Frequency layers. Rename the layer FS – 16bit. I have checked both the 8-bit and 16-bit actions on a different image, and they worked perfectly. Make all the layers visible and hide the Frequency Separation group only.
If you see that there is no change, then the action you have created is proper. If not, there must be some kind of mistake. Correct that, and you are good to go. You can delete any step while creating an action. Press the Stop button and delete the step. Then press the record button again to continue action creation.
Things To Remember | How to Create Actions in Photoshop
To use the Photoshop Action Panel, you need to remember some matters to make it effective. Whatever action you take is not useful for all other images. Why? Because the things you did for one image may not apply to different types of images.
- If you take a new layer during action creation and draw something, you will have a layer. But you will not have the drawing.
- If you add a mask and make some changes like Hue/Saturation adjustment, Curves adjustment, etc., you will have that. But if you show/hide some areas in the mask, Photoshop will not record that.
- Photoshop will not save any edits during action creation. So, if you retouch or modify an image with the Brush tool, Blur tool, or Clone tool, you will not have the modification.
That’s pretty much of it. I hope this helps to create an action. Use your creativity and do experiments with other steps that I could not cover here. Do the steps with proper implementation. The action set is very effective for a large number of images. If you handle one or two images for an action, that would be a loss of time.
Frequently Asked Questions
To save an action in Photoshop, you do not need to save it separately. Record the steps, and the action is saved automatically. But, if you want to save the action on your hard drive, go to the grid on the upper right portion. Click on that and select the ‘Save Actions’ option, select the location, and save.
Open the action window, select the action you need, and hit the play button. If you do not have the action in your actions set, go to the grid on the top right of the window first. Click on that and select load action. Locate the action set from your storage and load it. When you see the action in your vault, hit the play button.

