
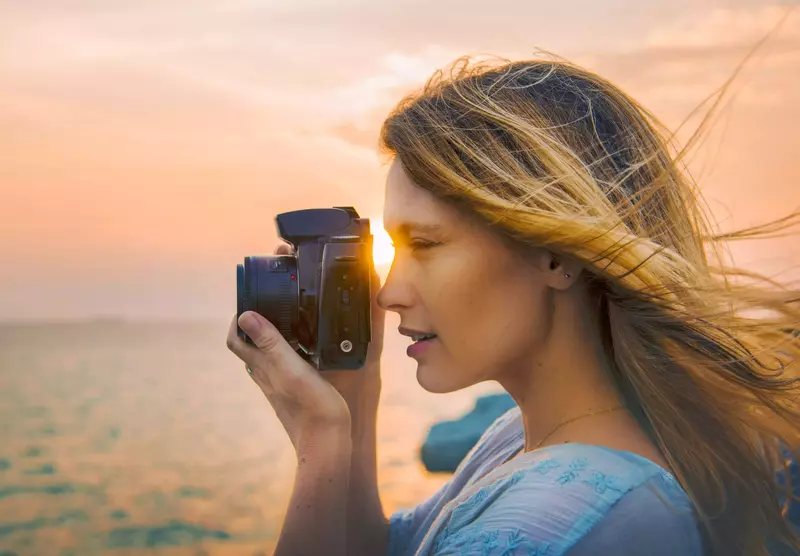
Hello, photographer! Are you ready to take your shots to the next level? Many beginners struggle to capture stunning photos because they’re still learning camera settings, lighting, and timing.
The truth is, great photography is a perfect blend of light, passion, environment, and timing. If you want to level up your skills, you’re in the right place. In this guide, you’ll discover 30 powerful photography tips that will help you shoot confidently and creatively—no matter your gear.
Camera Settings & Technical Skills for Beginners
01. Shoot Frequently to Improve Your Photography Skills
You need to shoot frequently and wait for the chance to capture a jewel. It’s not every day we get a chance to become a famous photographer. However, if you are trying hard to reach that level, you will do it one day. Until then, you need to try hard and get attached to the niche that you want to work in.
If you are an iPhone user, do iPhone photography in addition to this practice, giving you excellent output. We all know that iPhone photos are in great demand among the public. As a beginner, you can continue this practice. As a newbie, if you do not have any DSLR cameras, start shooting with your smartphone now. Do not wait until you buy a new DSLR camera.

For instance, if you get a chance to capture a beautiful natural beauty and do not have a DSLR camera, do not hesitate to capture it. In your professional life, you will often not get a chance to capture something special. As a photographer, you must wait for the right moment and try to use it well.
02. Understand Your Camera Settings
You will need to know the ins and outs of your camera. This is necessary when you are working on a large niche. Most importantly, you should have a clear idea regarding the camera’s aperture and lens. When you are taking pictures of the sunshine, or directly focusing on the subject, like taking a picture of a flower.

This time you must have a clear idea regarding the focal length and whether the aperture of your camera is high or low. Otherwise, it will be impossible for a photographer to capture the photo with a specific background or vibe.
03. Aperture Tips for Portraits & Landscapes
You can simply control the camera aperture, which could be high or low. If the camera aperture is f/2.4, it will pass a lot of light, and this form of the aperture is used for some special photos where the amount of light is very low.
The range of aperture could be f/4, f/5.6, f/8, f/10, f/12, etc. “f” means the focal length. The lower the aperture, the less light it will pass to the camera.

You must decide whether to take the photograph in broad daylight or in the evening when the light source is low. If you take a photograph at night, we suggest you use the bigger aperture. If you like to focus only on the subject, then try using an aperture of f/12 or above.
04. Fast Shutter Speed for Action Shots
Do you have any ideas regarding the shutter button? When the sensor collects the light, the shutter closes. The button that fires the camera is called the shutter button. It triggers the shutter to close and open. Shutter speed is linked up with the length of time the camera sensor is ultimately exposed to light.
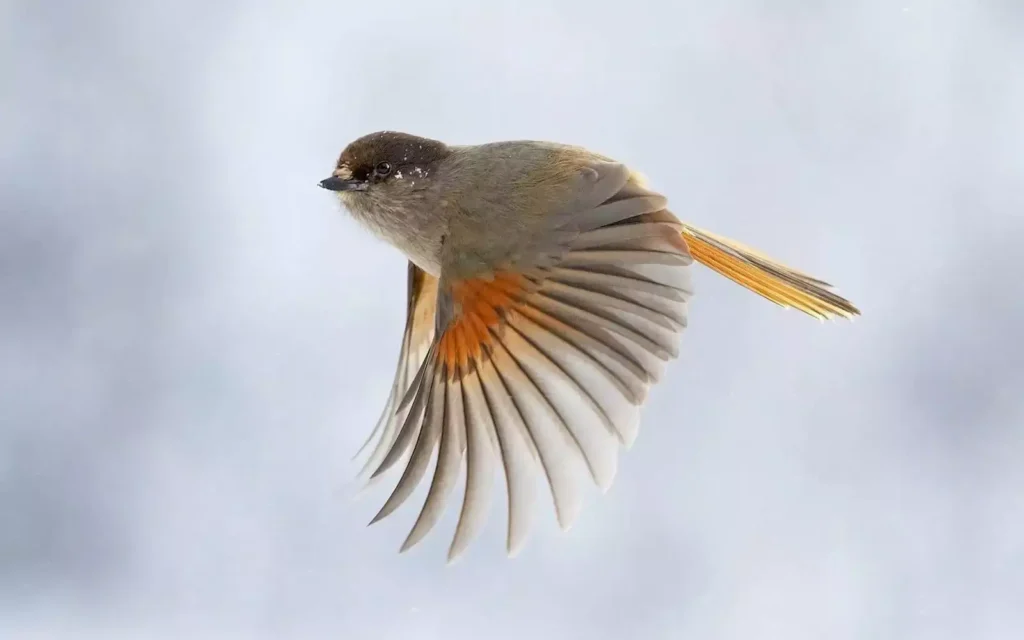
In other words, shutter speed measures how much time it takes to capture a photograph. The potential output will be blurry if you use a slow shutter speed. This is not a good idea when you are capturing wildlife photography.
We recommend you use a fast shutter speed for taking beautiful pictures of a flying bird or a heinous animal. This bird was captured when it flew in the sky at a fast shutter speed. If you use a low shutter speed, that will not give a positive result.
05. Avoid Overexposure and Underexposure
We already know that aperture, shadow, sensitivity, etc., influence images in many ways. As a beginner, when you are trying to do something different, there is a chance that you might make a mistake.
It will simply ruin your entire effort, and the result will not be good. While doing a photoshoot, it needs to be ensured that there will be an ample amount of light. Not too heavy or too low. Overexposing will make the client bothered, and it will have a direct impact on your career.

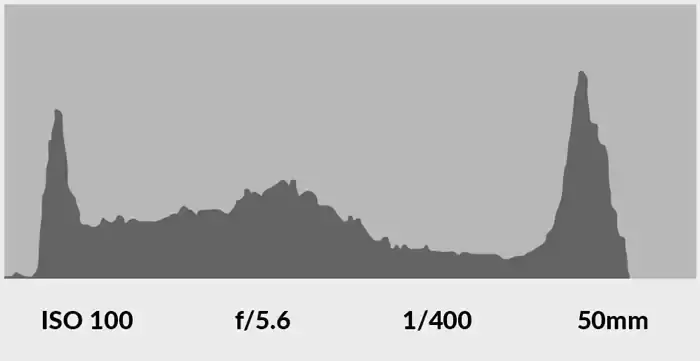
06. Check Your Exposure with the Camera Histogram
While doing landscape photography, it is necessary to balance extreme brightness and shadowed backgrounds. If we check the camera’s histogram, that would be a great idea. This process will help you balance everything.
07. Keep Your Camera and Lens Clean
You will have to protect the camera lens from water and rain. This is the first motto to keep your camera clean. The next piece of advice that we’d like to give you is to not handle the memory card with wet hands.
Mastering Photography Lighting Techniques
08. Use the Front Light to Highlight the Subject
Even if you have good daylight, there are quite a few things that you can do additionally, like adding some extra light sources to make the subject more specific.
Additional lighting will be a plus point when we do the product photography. Lighting is a must here, especially when we shoot some jewelry products. Have a look at this photograph!
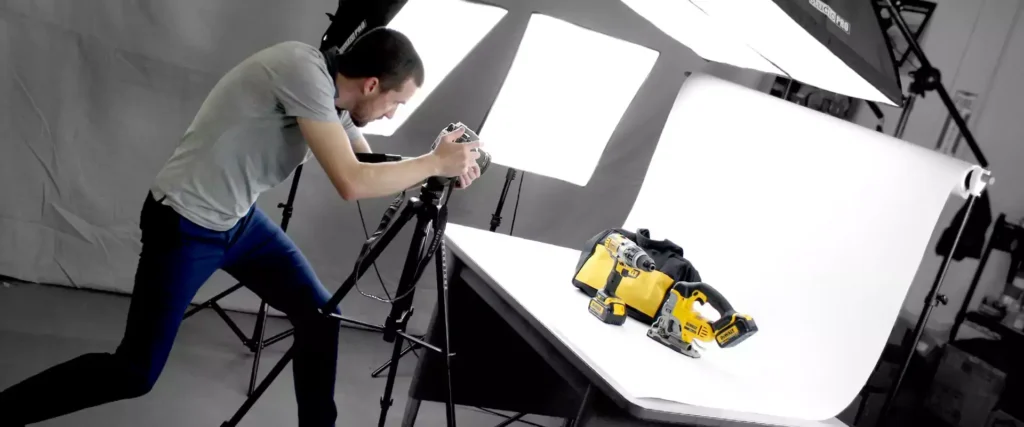
Now, the image quality will depend on so many things, like the amount of light, the lens of the camera, and, most importantly, the skill of the photographer. While shooting in the golden-hour light, you must pay attention to the direction.
09. Backlight Tips for Dramatic Photography
So already, we have discussed how the front light will affect your photograph. Now let me tell you that backlight will also play a significant role in the era of photography.
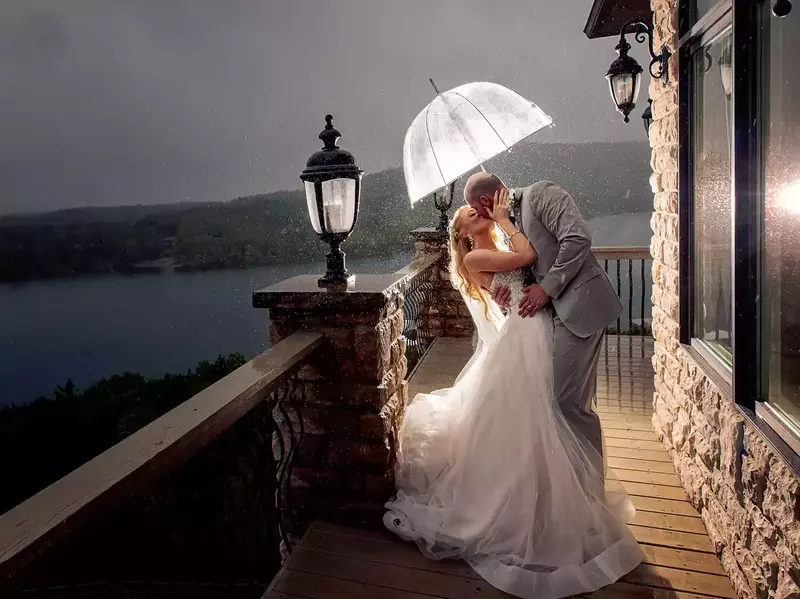
If you add a backlight, that will also create a romantic as well as thrilling experience. Now, how do you choose when you use a backlight or frontlight? It depends on the niche and the motto of the photographer.
10. Sidelight Photography for Depth and Texture
Already we have discussed the front light and the backlight for different types of photography products. Let me share with you another interesting idea that will help you capture an interesting photo.
When you are planning to experiment and would like to capture the best photograph, using sidelights on your target object could be a smart choice.
Do not experiment with it for all objects, like babies or newborn photoshoots. We suggest you use it for travel, friends’, indoor, outdoor, and post-production photography.
11. Golden Hour Photography Tips
There are several photography niches available, and you can choose your own. For instance, it could be wedding photography, baby photography, wildlife photography, fashion photography, nature photography, etc. Now, the interesting thing is, that each of them will need different types of photography lighting and atmosphere.

The preparation will be different as always. While you are doing fashion photography, artificial light might be used. On the other hand, while doing wildlife photography, the perfect times could be the morning and evening.
While doing a photo shoot, ensure every detail of your target subject is clear. In the morning and evening, you will enjoy the soothing light, which is good for the environment as well as photography.
12. Shooting in Cloudy Light for Softer Images
Not all the time, you have the perfect light at the perfect time. There are 3–4 seasons in your country. As a result, the weather frequently changes.

Sometimes the gloomy sky can be a great option. The fading of the harsh sunlight will make the subject more natural and softer. Have a look at this picture! I hope you’ll clearly understand how a cloudy sky will change the atmosphere. It will make a significant change here.

Do not experiment with it for all objects, like babies or newborn photoshoots. We suggest you use it for travel, friends’, indoor, outdoor, and post-production photography.
13. Use Supplementary Light for Evening and Night Photography
While shooting at night or in the evening, you must use the frontlight or backlight, depending on the niche. Most often, we do a birthday party at night. During this time, you must adjust to the color, festoon, and light.

Composition and Framing Tips
14. Rule of Thirds: The Golden Ratio for Better Photos
The “Rule of Thirds” is the common theory for capturing a photo. Thousands of photographers and scientists have said that if we used this angle, it would be eye pleasant.
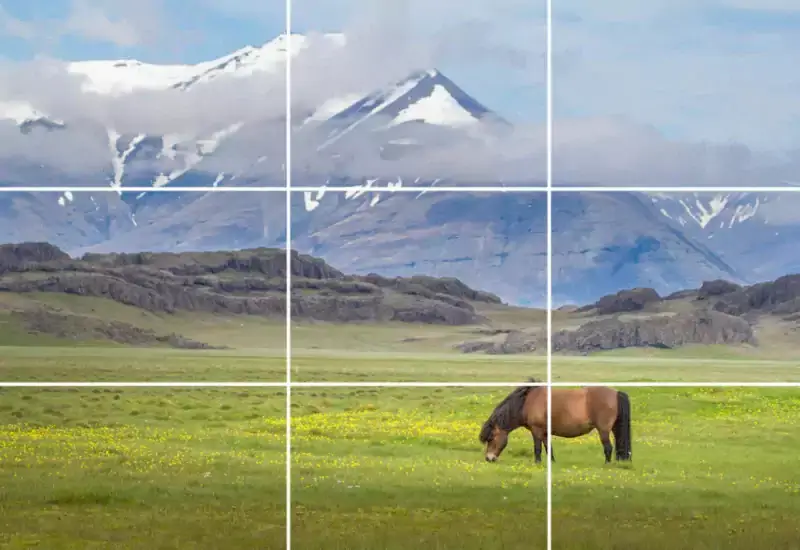
We call it the golden ratio. Have a close look at this photo. It is placed in the two-third position in the diagram. It looks amazing.

If the image were placed in the middle or any other corner, that would not be a smart idea. You can easily use this technique not only for wildlife photography but also for some other types of photography.
15. Experiment with Camera Angles and Viewpoints
Not every angle of your camera will be perfect. In that case, we are suggesting you do the experiments. Like when capturing a flying bird, every angle and point of view is important. At the same time, you need to look sharp at the sky.
16. Pay Attention to Backgrounds in Your Shots
When we are shooting in nature or doing wildlife photography, the background is not always fixed, and it will change sometimes. During this time, you have to adjust the background. It is extremely necessary; otherwise, the image will be imbalanced, and it will lose its intensity.
17. How to Avoid Blurry Pictures
Blurry pictures are always becoming a headache for photographers, and they will try their level best to avoid them. The initial preparation you can do is to take more pictures to avoid blurry ones.
If all the elements of your images, like light, ambiance, and aperture, are okay, but for some reason, they become blurry, all your efforts will end up in the smoke. It looks tedious. So try to avoid this pattern.
Lenses & Accessories That Improve Your Photography
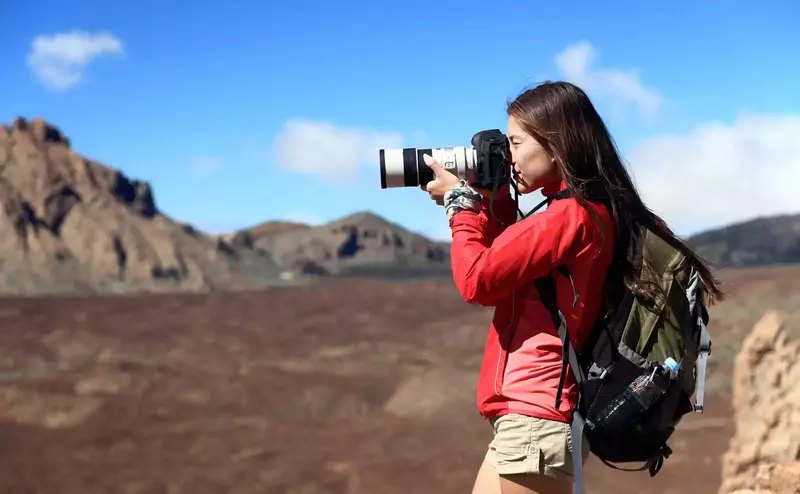
18. Use a Long Lens for Macro and Nature Photography
When we do micro photography, try to use a long lens. It will help you capture every detail of the image. Especially for the flowers and small animals. These tricks will help you have a great image.

19. Tripod Tips for Stability
As a beginner, you might think it is unnecessary to buy a tripod. However, it will affect your photograph, and the result will not be good. Especially when we are doing product or fashion photography. it is a must issue.

20. Choose Wide vs. Narrow Aperture for Different Shots
When we think of landscape photography, the scenario will be different. This time you need to look for the narrow camera aperture, and it will provide you with the best landscape photography for your blog.

As much as the “f” value will increase, it simply means the narrow aperture for the picture. If you are new to this format, try to use it. This is an awesome landscape photograph with a narrow aperture. It is better than some other landscape photography where the aperture is not maintained properly.
21. Use a Wide Aperture for Portrait Photography
While we are planning for portrait photography, we recommend you do it in a wide aperture. The aperture could be f/1.2 to f/5.6. It will pass a plethora of light to the camera lens and eventually create a high-definition image. It will help you capture some sharp images and not concentrate on the background.

Post-Processing and Photo Editing Tips
22. Invest in Some Good Photo Editing Software
Besides a good camera setup, you will also need some good photo editing software for the presentation. Remember that not every image will be perfect, and you’ll need some great editing software for a productive result.

The most popular photo editing software is Adobe Photoshop, Canva, Adobe Illustrator, etc. Additionally, you can learn some basic photo editing techniques as well. Otherwise, you need the help of a photo editing agency.
Mindset, Practice, and Learning
23. Practice Regularly to Boost Your Photography Skills
As a beginner, you will make a plethora of mistakes. Do not lose your heart, and try to learn now and then. You can always look for various photography studios, blogs, journals, etc. In this way, your skills will increase, and the photos will be more attractive than before.
24. Capture Photos in a Carefree and Confident Mood
When you are capturing a picture for an album or a client. Do not put too much pressure on yourself. It will simply divert your concentration and, eventually, make the images distract from the subject. Self-belief is a vital fact, and it is necessary for every sector.

25. Read Photography Blogs and Get Inspired
You will need to read different photography blogs and other forums to learn more. In this way, your knowledge will increase, and after a certain time, you will enjoy the result. Somehow, if you are feeling bothered, try to read some other lifestyles of various photographers. It will inspire you to learn more about this niche.

26. Enjoy Every Moment While Shooting
Try again after the photo shoot if you do not get great photos. The reason is that the upcoming photoshoot will be great. Be confident in your work and enjoy every second.
Niche Photography Tips for Specific Styles
27. Headshot Photography with Speedlight and Softboxes
If you are willing to take a photograph for a head and shoulder portrait with a Speedlight, slowly move off the camera and use a softbox flash or modifier. Eventually, it will provide you with an awesome image. This process will help you take pictures with more rounded and flattering faces.

28. Fine Art Photography Using Natural Light
When planning your fine art photography, try using natural light. In broad daylight, capture the aesthetic image. That would be gorgeous. Have a look at this image below! It looks stunning.

Both daylight and night view pictures have a different taste, and you will feel it. We recommend you shoot artwork in the daylight that will portray every detail.
29. Street Photography Tips for Urban Scenes
It is one of the most modern forms of art and photography techniques in recent times. While doing street photography, use the low aperture of your camera, and it could be fine. Try to focus on a specific subject in the street. The city streets are busy and noisy, so it has a different appeal.

Sometimes you must wait the entire day to shoot artistic street photography. After completing the photo shoot, you can use some photo editing apps for perfection. It has a different taste in both summer, winter, and in autumn. As a result, pick up the season carefully.
30. Make A Plan for Boudoir Photography Shots
You need to think about the present and the future at the same time. Boudoir photography is a model photoshoot; here, a dress and light combination is necessary. You must create the environment properly and then use a long lens for the perfect capture.
Check Our Latest Articles
Final Few Words | Best Photography Tips
Follow this list, you will be a professional photographer shortly. If you like to know more about the top photography tips, do not hesitate to leave your comments below. Be confident and stick to your target. Hopefully, you will win the race.
FAQ | Photography Tips
To be a famous photographer, you must think ahead and do some great work. Your achievements and extraordinary photos will make you different from others. Read about famous photographers and their legendary photos.
It will describe the contrast ratio between the darkest and brightest color tones. The camera will take it in a single exposure. As a photographer, you need to know the dynamic range in detail.
Before pressing the shutter, there are a few key things every photographer should keep in mind to ensure a high-quality shot:
1. Check Your Light Source – Make sure the subject is well lit, whether it’s natural or artificial light. Avoid harsh shadows unless intentional.
2. Adjust Camera Settings – Set the right aperture, shutter speed, and ISO based on the environment.
3. Mind the Composition – Use techniques like the rule of thirds or leading lines to make your photo visually appealing.
4. Focus on the Subject – Ensure your subject is sharp and well framed.
5. Eliminate Distractions – Check the background for unwanted elements or clutter.
6. Hold Steady or Use a Tripod – A stable camera helps avoid blur.
7. Tell a Story – Think about the emotion or message you want your photo to convey.