Do you have any ideas for a new background layer action in Photoshop? It is not a complex task. Just read this article, and you will learn it within 30 minutes. Often, the limits of the background layer will not be a severe issue. If you’re in a photo editing job, changing exposure and contrast, fixing colors, and eradicating skin imperfections will be your regular tasks.
Those working with photo effects, compositing many photos, or doing anything else need different backgrounds simultaneously. A simple illustration will assist you in completing this process efficiently. You can use this process for any picture. Stay with us and enjoy this article.
What is the Background Layer?
When opening a new image in Photoshop, it creates a background layer with the document. You will notice this layer on the right side of your Photoshop window.
What Do You Mean By “Layer Action” in Photoshop?
Layer action is a Photoshop feature for multiple uses. A layer action can be tracked in both real-time and fixed time. The layer-action technique allows easy creation of multiple layers.
Plotting | Background Layer Action
When we open a picture in Photoshop, it is immediately placed on the background layer, as seen in my Layers palette. For instance, I wish to display this image against a white backdrop. Here we have a white background serving as a border around the image. That sounds simple enough, doesn’t it? And yet, there is an issue.
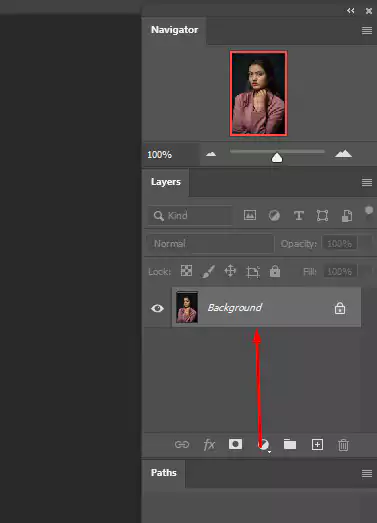
For instance, I wish to display this image against a white backdrop. Here we have a white background serving as a border around the image. That sounds simple enough, doesn’t it? And yet, there is an issue. Given that my photo is now the document’s backdrop, how can I replace it with another? The answer is that I am unable to. Photoshop will not permit any further layers behind it.
And suppose I also want to include a simple drop shadow beneath the image. Again, it sounds simple, but we run into the same issue. We need something else beneath it to reveal the shadow. However, Photoshop would not allow us to insert anything behind the background layer.
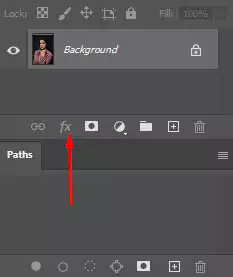
Indeed, if we look at the Layer Styles symbol (the “fx” icon) at the bottom of the Layers panel, which is often used to create a drop shadow (along with any other layer effects), we notice that it is grayed out. We are unable to add layer effects to the background layer in Photoshop.
So, What Is The Solution?
To be precise, the answer consists of two components. Initially, we’ll change our basic background layer to a regular layer. This way, we’ll have total control over the image and be able to manipulate it however we choose. Second, we’ll create a new background layer and position it behind the image.
Both of these tasks are relatively straightforward. However, even basic tasks take time. Therefore, this is a task we’ll do in Photoshop. However, we love to do those steps manually each time. We’ll go through them all once and store them all as actions.
What exactly is an action? In Photoshop, an action is a sequence of prerecorded tasks. Create a new activity and record your actions. Following that, whenever you need to repeat the same procedures, rather than doing them manually, you can play the action and let Photoshop do the job for you! If we’ve recorded the procedures for establishing a new background layer, we may have Photoshop build one for us in the future by just playing the action. Let us see how it functions.
How To Set A Background Layer Action
Step 1: Firstly, you need to check your background color
A new background layer in Photoshop is always filled with the color of the previous background layer. We should double-check our background color settings before continuing. Foreground and background colors are present at the bottom of the Tools panel. Eventually, it will represent the color swatches. Of course, Photoshop’s default settings for the foreground and background colors are black and white.
It is assigned accordingly, one after another. This process proves that white is the most commonly chosen background color. It represents the fundamental colors well. To quickly restore your foreground and background colors to their standard settings, press the letter “D” on your keyboard. Think “D” for “Default colors”.
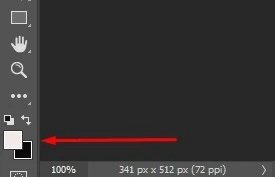
The letter D on your keyboard will restore the foreground and backdrop colors to their standard settings if you prefer a black background rather than a white one (if needed). Hit the letter X on your keyboard to switch between them, which will change your background color to black.
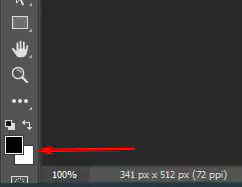
You may press the X key again to return to the default settings, which I’m going to do since I want to fill my background layer with white instead of black. Regardless of your option, double-check your background color before creating the background layer, and create a new layer in Photoshop.
Step 2: Open the Action Panel
To record our actions, we must use the Actions panel in Photoshop. The Actions panel is not one of the panels Photoshop opens for us by default; instead, we’ll have to open it ourselves.
Navigate to the Window menu by selecting it from the Menu Bar at the top of the screen. Here you’ll discover a comprehensive list of every panel that we have access to in Photoshop. Choose the Actions panel from the drop-down menu. You’ll see a tick next to the panel name if the panel is already open somewhere on your screen. To make sure you don’t miss out on the checkmark, go ahead and click on it.
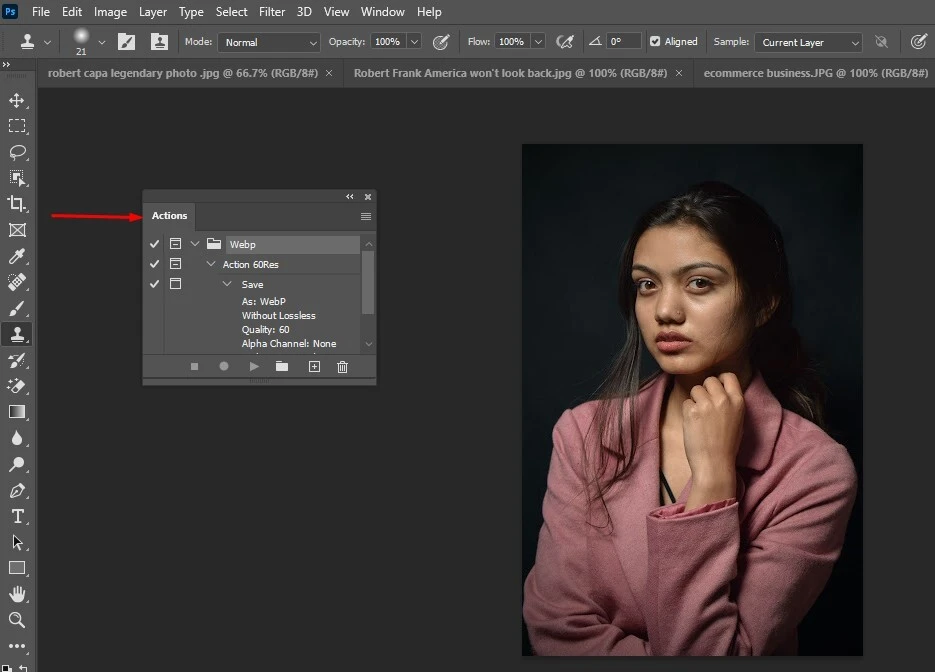
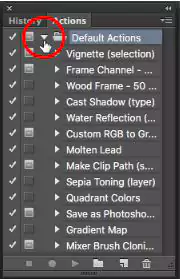
The actions panel will be shown as a result of this. Photoshop is pre-loaded with a set of fundamental actions known as Default Actions. With the triangle icon to the left of the small folder symbol, you can access the Default Actions set and look at the included actions. It is possible to close the set by clicking the triangle a second time.
Step 3: Create A New Action Set
We’re going to develop our Photoshop action, and instead of including it in Photoshop’s preset actions, we will construct a new action set. An action set is similar to a folder that contains the actions. By creating distinct action sets, we may group relevant actions. This process will bring up the New Set dialog box, and eventually, we can give the set a name and save the changes.
You have complete freedom to call it whatever you choose. “My Actions” will be my title. Click OK to close the dialog box when you are finished. In the Actions panel, a new set of actions appears beneath the existing Default Actions set:
Step 4: Create A New Action
Let’s construct a new action now that we have our set. Right next to the New Set symbol, click the New Action button:
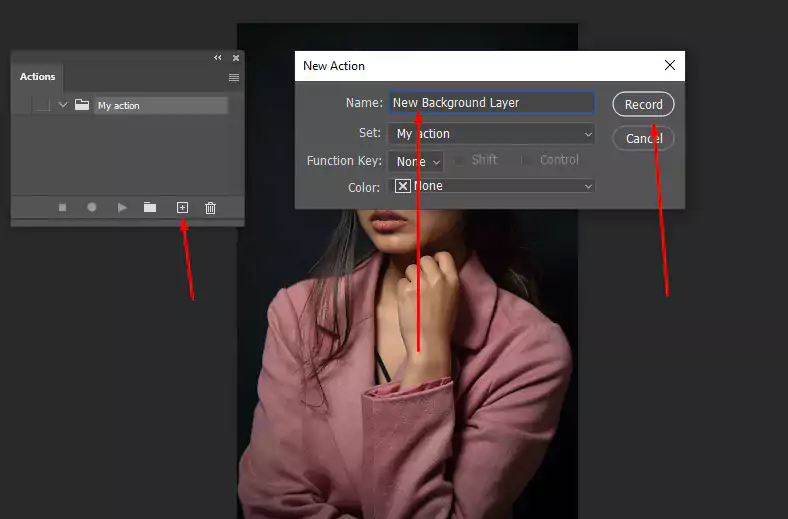
This process will introduce a dialog box where you may create a new action. Give your activity a catchy title that will get people interested. “New Background Layer” is what I’m going to call mine.
Once you’ve done this, make sure that the Set option (short for Action Set) directly underneath it displays the action set you’ve just created, which in my case is called “My Actions.” Specifically, we want to make sure that the action is placed in the appropriate set.
Step 5: Click “Record”
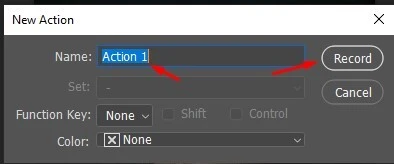
You may begin recording your actions by pressing the Record button when you’re ready to do so.

The red record sign has been activated in the actions panel. It indicates that we have entered record mode, as shown below.
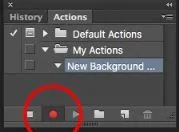
From this point forward, Photoshop will record our activities and allow us to play them back afterward. However, please do not be anxious about how much time it will take to complete the processes. The act of recording action in Photoshop is not the same as the process of capturing a video. To put it another way, we are not recording real-time video footage.
Photoshop only stores the individual jobs, not the time it takes to complete them. As a result, please take a seat, relax, and take as much time as you need to allow us to document our actions.
Step 6: Convert The Background Layer Action Into A Normal Layer
We’ll first transform our present background layer into a regular layer. To do so, select New from the Layer option at the top of the screen, followed by Layer from Background.
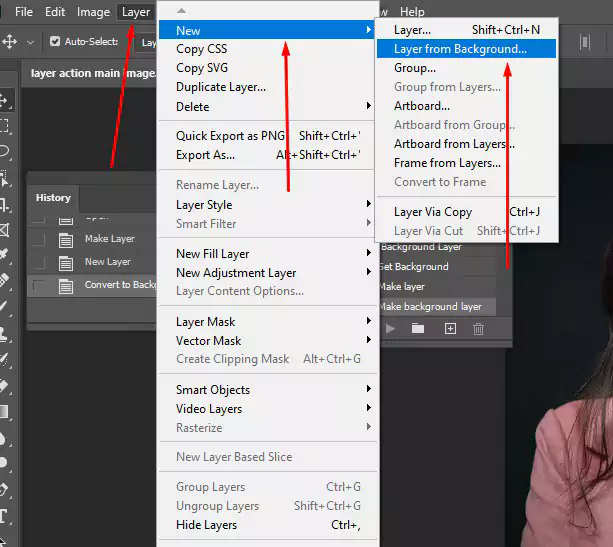
In this way, it will open the New Layer dialog box. You can name them “Layer 0” and click OK to shut out of the dialog box.
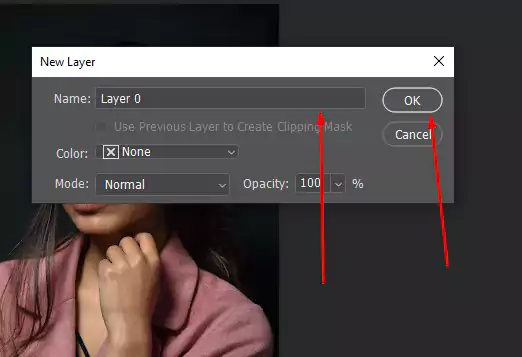
Looking at the Layers panel, we can see that our background layer has been renamed. It has been renamed “Layer 0”. Thus far, everything appears to be in order.
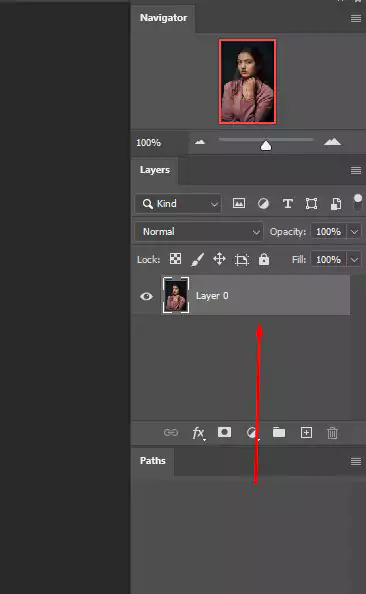
Step 7: Add A New Layer
Following that, we’ll create a new layer, which will serve as our new background layer. At the bottom of the Layers window, click the New Layer icon.
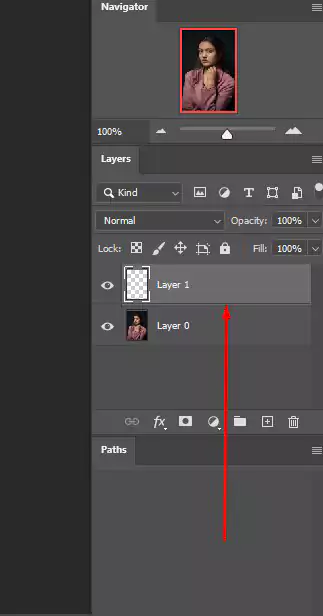
A new blank layer labeled “Layer 1” is created above the image in Photoshop. We are showing the figure below.

Step 8: Convert The Layer Into A Background Layer in Photoshop
Convert the newly formed layer to a background layer by selecting it from the Layers palette. Return to the Layer menu and select New, followed by Background from Layer: from the drop-down list.
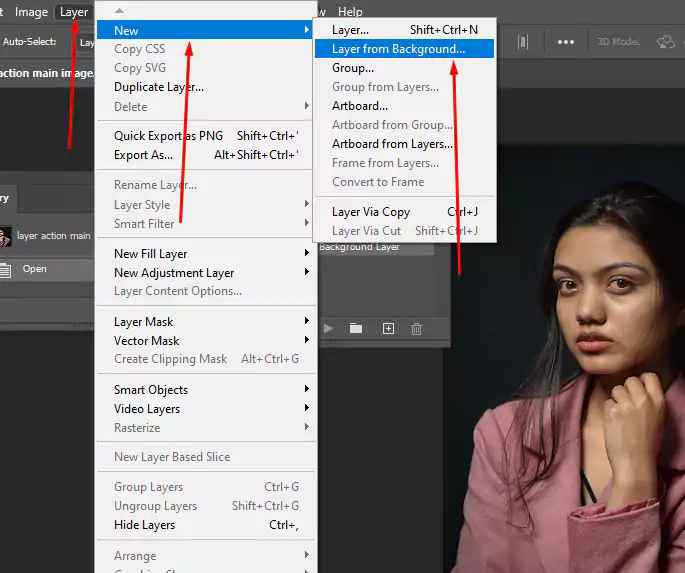
Several events take place. The first thing that happens is that Photoshop automatically moves it from above to below the picture in the Layers panel when the layer is transformed into a background layer. Since one of the critical restrictions regulating background layers is that they must always be the bottom layer of the page, this is the case with how to crop a layer in Photoshop.
When we look at the preview thumbnail for the Background layer, we can see that Photoshop has filled it with white, which is in keeping with the rest of the layer’s name. As previously noted, Photoshop fills the background layer with the color currently selected as the background color. In my situation, the color was white.
Step 9: Stop Recording
We’ve completed all of the tasks that were necessary at this point. We converted the existing background layer to a regular layer and started creating a new one from scratch. Since there are no more steps to record, we’ll close down our action recording by clicking the Stop icon (the square) towards the bottom of the Actions panel.

The steps necessary to create a new background layer are stored as an activity! The steps are mentioned beneath the action’s name. However, we do not require their visibility, so I’m going to toggle the action closed by clicking the triangle symbol to the left of its name.
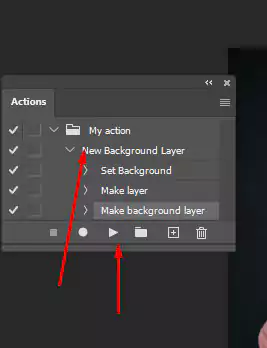
And now, in the “My Actions” collection, we see the action’s name (“New Background Layer”) and no more information about it.
Step 10: Revert The Image
Let us check that our new activity is effective. To do so, click “Revert” from the File menu at the top of the screen.
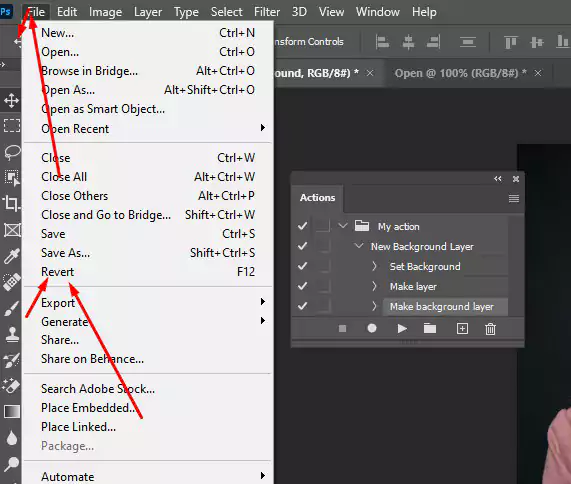
In Photoshop, the Revert command restores the picture to its previously saved state or, as in this example, to its initial, newly opened state. Looking at the Layers panel, we can see that we’ve restored our picture as the document’s background layer.
Step 11: Play The Action
Before we begin testing the action, I will switch the colors of my foreground and background by clicking the letter X on my keyboard. It will make my background color black rather than white.

Let us begin the action and observe what occurs. To play it, choose it by clicking on its name in the Actions panel.

Then, click the triangle symbol (the Play button) to begin playing the song. Photoshop can replay operations in real time, regardless of how long it takes us to capture them. Returning our focus to the Layers tab, we can see that everything was OK.
In addition, the previous background layer has been converted to a standard layer designated “Layer 0,” and a new background layer has been constructed and placed beneath it. It’s essential to observe that the preview thumbnail for my new background layer is now filled with black rather than white, as opposed to the previous one. The reason for this is that I changed the backdrop color of the action to black before doing it.

Step 12: Changing The Color Of The Photo Background Layer
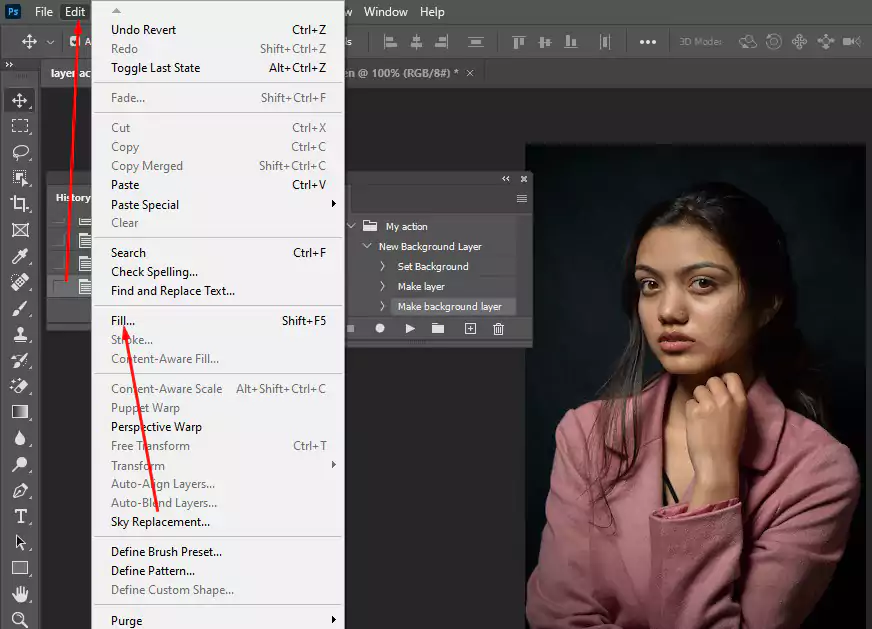
There’s nothing to be concerned about if you forgot to check the background color before acting and ended up with the wrong color for the background layer. After that, you can easily change the color of the object. Choose the Background layer from the Layers drop-down menu in Photoshop. Then, pick Fill from the Edit option at the top of the screen.
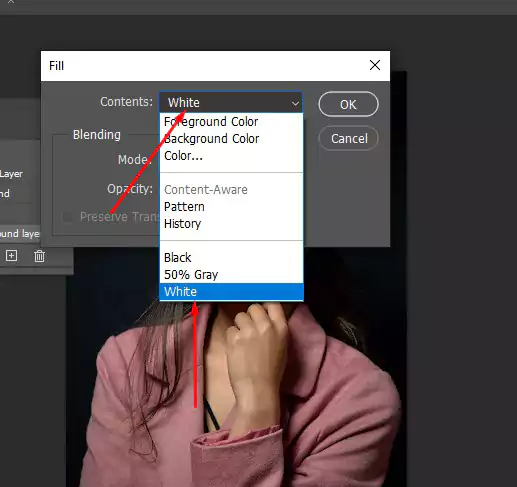
I need a white background layer. So I’ll change the Use option at the top of the Fill dialog box to White:
Step 13: Transform The Layer
Photoshop fills the background layer with your selected color when you click OK to clear the dialog box. When we examine the preview thumbnail for my background layer again, we notice that it is white:
Naturally, we haven’t seen the background layer in the document yet due to the photo blocking it, so I’ll quickly resize my photo by choosing its layer (Layer 0) in the Layers panel. Afterward, I’ll select Free Transform from the Edit menu at the screen’s top.
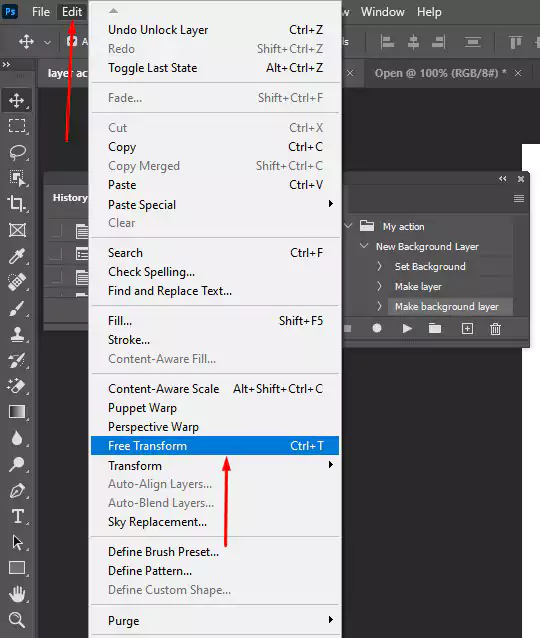
This process will encircle the image with the Free Transform box and handles. I’ll hold Shift+Alt (Windows) / Shift+Option (Mac) on my keyboard as I click and drag the handle in the upper left corner of the image inward to resize it.
Holding the Shift key while dragging maintains the picture’s aspect ratio when resizing, whereas the Alt (Windows) / Option (Mac) key resizes the image from the center rather than the corner. This way, insert the Free Transform box and handles around the picture. I’ll press and hold Shift+Alt (Win) / Shift+Option (Mac) on my keyboard as I click on the handle in the upper left corner of the image and slide it inward to make the shot a bit smaller.
I was holding the Shift key while dragging the picture’s aspect ratio as I was resizing it, while the Alt (Win) / Option (Mac) key resizes the image from its center rather than from the corner. With the image now smaller, we can see the white backdrop showing as a border around it. On my keyboard, I’ll accept the transformation by pressing Enter (on Windows) or Return (on a Mac), which will allow me to exit the Free Transform command.
After that, I’ll give the image a realistic drop shadow in Photoshop by clicking the button for Layer Styles located at the bottom of the Layers panel.

Step 14: Adding Drop Shadow
From the selection of layer styles that just appeared, I’m going to pick Drop Shadow.
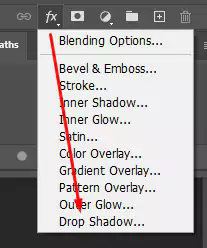
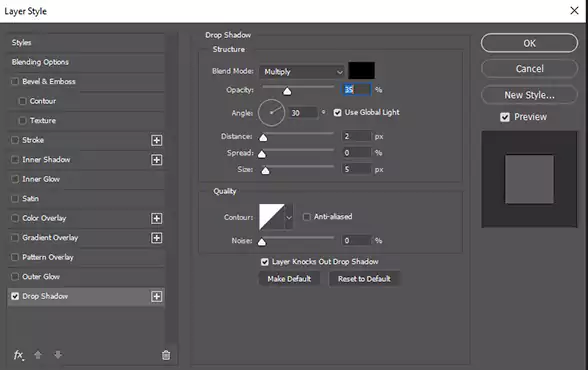
This action brings up a dialog box in Photoshop called Layer Style with the Drop Shadow choices selected in the center column. I’ll adjust the angle of the shadow to 135 degrees so that the light comes from the screen’s upper left corner.
Then, because I’m working on a large image here, I’ll make the distance of the shadow 40 pixels, and I’ll also make the size value, which governs the amount of fuzziness along the borders of the shadow, 40 pixels. Both of these values will be 40 pixels. Last but not least, I’m going to reduce the opacity of the shadow by fifty percent.
This last part (resizing the image and adding a drop shadow) was a bit beyond the scope of this tutorial (which is why I went through it quickly). Still, it served as an example of something we could do with the image that would not have been possible if the image had remained in the document’s background layer.
If the image had remained the Background layer for the document, we would not have been able to resize the image or add a drop shadow. We could break free from the constraints imposed by the background layer after converting the picture into a regular layer and putting our distinct background layer underneath it.
This process will make it much simpler for us to accomplish our objective. If we record it as an action, it is necessary to change the default background layer to a new one. All we have to do is play the action. Photoshop will complete the rest of the work.
Final Few Words | Background Layer Action in Photoshop
We have discussed this tutorial in detail. Our motto is to help people so that they can learn the basics of Photoshop from the beginning. So, if you have found anything confusing, do not hesitate to leave comments below. Again, if you want to learn something new, you can email us at info@clippingworld.com.
FAQ
How To Make A Good Background?
You need to do several things to make the background unforgettable. Let’s discuss them one after another.
- You can choose a plain background. Keep a thing in mind that the background must fit with the image.
- Highlight your subject correctly.
- We need to crop the image perfectly.
- Balancing is essential when you are choosing a background for the image.
What are the Types of Layers? | Layer Action in Photoshop
In Adobe Photoshop, there are several types of layers, and we use them in different ways. When we start working there, our first task is to select a layer and then make the change from the layers panel. The types of layers are
- Image Layer: If we import an image into Photoshop, it will have some layers by default.
- Smart Object Layer: It will carry the same information as a normal layer but have some exceptional facilities. In this process, you cannot degrade the image quality.
- Fill layers: This technique is used for solid colors, gradients, and patterns.
What is the Blend Mode in Photoshop?
In the Photoshop blend mode, the user can make different types of effects. This tool helps adjust pixels within images. If there are several images and some of them are of high quality and others are of low quality, we wish to make them of the same quality. In this case, the solution is to use the Photoshop blend tool.
What is the Layers Panel in Photoshop?
We can describe layers as transparent sheets of glass where we can draw our images. Here, we will enjoy the flexibility to work on each layer differently. It is like “layers within the layers”.

