
A transparent background is an image background with no visible color or layer behind the subject. The transparent areas allow the image to blend seamlessly with any website, design, or layout. Transparent backgrounds are commonly used in ecommerce product images, logos, and graphic design.
Why Transparent Backgrounds Matter in Modern Digital Design
Transparent backgrounds are no longer optional in modern digital work. They are essential for ecommerce, branding, and scalable visual design.
Modern visuals need to adapt across:
- Websites
- Online marketplaces
- Social media platforms
- Advertisements
- Packaging designs
- Mobile applications
If an image is locked to a white background, flexibility becomes limited. A transparent background removes that limitation.
For businesses, this is helpful. One properly edited image can be reused in different layouts. There is no need to redesign it each time. That efficiency improves both workflow and brand consistency.
What Is an Image with a Transparent Background Called?
Depending on context, transparent images are referred to by different names:
- Transparent PNG – The most common web term
- Alpha-enabled image – Refers to images containing an alpha channel
- Cut-out image – A subject separated from its original background
- Masked image – Created using masking techniques
- Background-free image – A descriptive non-technical term
Among these, “transparent PNG” is the most widely recognized phrase.
What Does a Transparent Background Look Like?
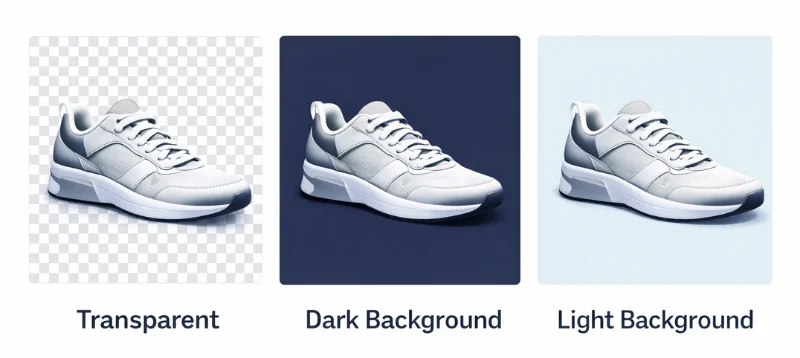
In design software, transparent areas appear as a gray-and-white checkerboard pattern. That checkerboard is not part of the image. It simply indicates empty pixels.
When placed on different backgrounds:
- On dark colors → Dark shows through
- On light colors → Light shows through
- On images → The subject integrates naturally
This ability to adapt instantly is what makes transparency powerful.
How Does a Transparent Background Work?
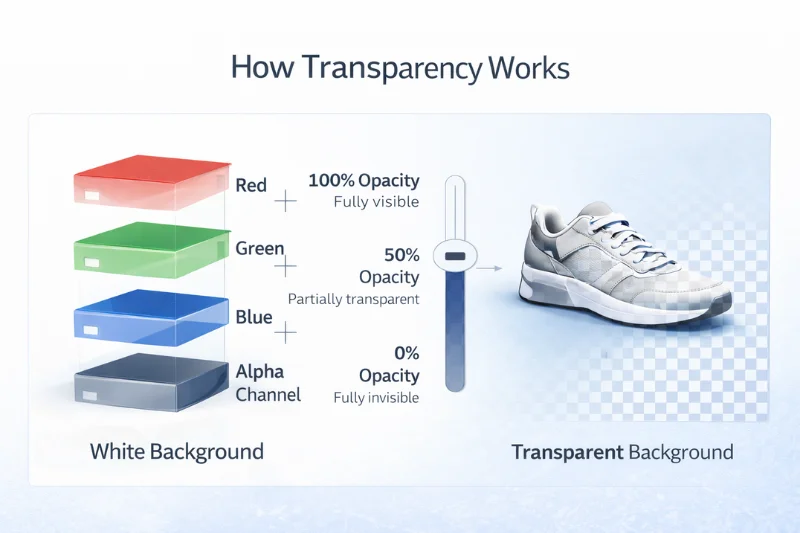
To understand transparency, you need to understand how images are structured.
Most digital images use three color channels:
- Red
- Green
- Blue
Images with transparency include a fourth channel called the alpha channel. The alpha channel is a standard concept in digital imaging and controls pixel opacity. The alpha channel controls visibility.
Think of it like a dimmer switch:
- 100% opacity → Fully visible
- 0% opacity → Fully invisible
- Between 0–100% → Partially transparent
This allows soft edges and subtle transitions, especially important for:
- Hair strands
- Fur
- Smoke
- Glass
- Shadows
- Fabric textures
Without proper alpha control, edges can look rough or unnatural. Advanced masking techniques are often used to refine complex edges and preserve fine details. Clean transparency keeps images realistic and professional.
Transparent Background vs White Background
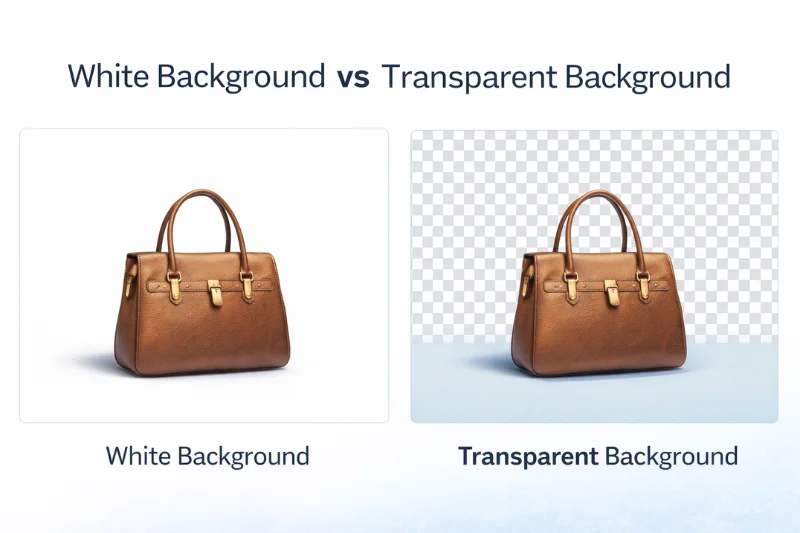
Many users assume white and transparent backgrounds are interchangeable. They are not. A white background is still a visible layer. A transparent background removes that layer completely.
Here is a practical comparison:
| Feature | Transparent Background | White Background |
|---|---|---|
| Background Layer | None | White color layer |
| Flexibility | Adapts to any color | Fixed appearance |
| Design Control | High | Limited |
| Marketplace Use | Flexible for creatives | Often required for Amazon |
| File Formats | PNG, SVG, WebP | JPG, PNG |
White backgrounds are useful for standardized product listings. Transparent backgrounds are superior for flexible branding and layered design.
File Formats That Support Transparency
Choosing the correct file format is critical when working with transparent backgrounds. Not all image formats preserve transparency, and exporting in the wrong format can permanently remove it.
Below are the most commonly used formats:
PNG (Portable Network Graphics)
PNG is the most widely used format for transparent images on the web. It supports full alpha transparency, allowing both fully invisible and partially transparent pixels.
PNG is ideal for:
- Logos
- Product images
- Web graphics
- Design overlays
Because it preserves edge detail and soft transitions, PNG is the safest choice for most transparent images.
SVG (Scalable Vector Graphics)
SVG is a vector-based format that naturally supports transparency. Unlike raster formats, SVG files can scale infinitely without losing quality.
SVG is best suited for:
- Logos
- Icons
- Illustrations
- Interface elements
It is especially useful when graphics need to appear sharp across multiple screen sizes.
WebP
WebP is a modern image format designed for web performance. It supports transparency while offering smaller file sizes compared to PNG.
WebP is useful when:
- Page speed optimization is important
- Transparent images need compression efficiency
- Websites aim to improve loading times
GIF
GIF supports basic transparency but does not allow smooth partial transparency like PNG. This means edges may appear harsh or jagged. GIF is generally not recommended for high-quality product images.
JPEG (Does Not Support Transparency)
JPEG does not support alpha channels. If you save a transparent image as JPEG, the transparent areas will automatically be filled with white. Once saved this way, the transparency cannot be restored. For transparent backgrounds, avoid JPEG.
When Should You Use a Transparent Background?
Transparent backgrounds are very useful. They help an image work on different platforms and layouts. There is no need to redesign it.
They are especially useful in the following scenarios:
1. Logos and Brand Assets
Logos almost always require transparency to maintain flexibility.
A logo with transparency can be placed on:
- Dark website headers
- Social media posts
- Printed materials
- Packaging
- Video overlays
Without a visible white box around it. This ensures brand consistency across all touchpoints.
2. Ecommerce Product Images

Transparent product images allow businesses to reuse assets more efficiently.
They can be used to:
- Repurpose the same product image across multiple campaigns
- Add seasonal or promotional backgrounds without re-shooting
- Create banners and ads quickly
- Maintain visual consistency across different channels
Some marketplaces require white backgrounds, such as Amazon product listings. However, transparent backgrounds give more creative control for marketing and branding.
3. Graphic Design and Advertising
Designers frequently layer multiple visual elements to create depth and hierarchy.
Transparent images make it possible to:
- Build overlapping compositions
- Apply realistic drop shadows
- Create composite visuals
- Design dynamic promotional graphics
Without harsh edges or unwanted borders.
4. App and Interface Design
In digital interfaces, icons and UI elements need to blend with different background colors. They should fit naturally into various layouts.
Transparency ensures:
- Clean integration
- Scalable design flexibility
- Consistent visual experience across devices
A transparent background removes visual limits. It helps images work across different platforms and designs. When used correctly, it improves flexibility and keeps visuals consistent.
You can create a transparent background manually using tools like Photoshop. If you’re unsure how to do it step by step, follow this guide on how to make the background transparent in Photoshop.
Where High-Quality Transparency Makes the Biggest Difference
Basic background removal is easy. Achieving clean, professional transparency — especially around fine details — requires precision.
The difference becomes most noticeable in high-detail areas such as:
- Hair edges – Fine strands must remain natural, not clipped or blocky
- Fur textures – Soft gradients require accurate masking
- Fine jewelry – Small reflections and intricate shapes demand precision
- Transparent objects like glass – Incorrect masking removes natural depth
- Fabric folds – Subtle shadows define realism
- Soft shadows – Removing them entirely can make products look flat
When editors handle transparency poorly, it often creates:
- White or light-colored halos around edges
- Rough, uneven cutouts
- Visible clipping along contours
- An artificial, pasted-on appearance
These flaws may seem minor, but they directly impact how customers perceive quality. In ecommerce, visual credibility influences trust — and trust influences conversions.
Professional-grade masking preserves natural edges, subtle shadows, and realistic depth. That difference separates basic cutouts from polished, brand-ready imagery.
Common Transparency Mistakes That Hurt Brand Image
Even minor transparency errors can make an image look unprofessional. In ecommerce and branding, small visual flaws often reduce perceived product quality.
Avoid these common mistakes:
- Exporting as JPEG
- Ignoring edge refinement
- Over-compressing PNG files
- Removing natural shadows
- Leaving color fringing around edges
Poor transparency signals low production quality. Clean, well-refined edges communicate professionalism and build customer trust.
How Transparent Backgrounds Improve Workflow Efficiency
Beyond aesthetics, transparency improves production efficiency.
One properly edited transparent image can be:
- Used across multiple campaigns
- Adapted to new layouts instantly
- Applied to different seasonal themes
- Integrated into print and digital materials
This reduces repeated editing work and keeps branding consistent.
Frequently Asked Questions
No. A white background is a visible color layer. A transparent background contains no visible pixels and allows other elements to show through.
PNG is the most commonly used format for web transparency. SVG is ideal for scalable logos. WebP offers smaller file sizes with transparency support.
Because JPEG does not support transparency. Save the file as PNG, SVG, or WebP instead.
Most images can be made transparent. This is done using background removal and masking techniques. Complex subjects need more careful work.
No. Image quality depends on resolution and compression settings, not transparency itself.
Final Thoughts
A transparent background removes the visual barrier between an image and its environment. Instead of being confined to a fixed color, the subject becomes adaptable and reusable across platforms.
Understanding how transparency works is important. This includes alpha channels, file formats, and export settings. When done correctly, it helps you create flexible and professional visuals.
In modern digital branding, transparency is not just a technical feature. It is a foundation for adaptable, high-quality design.
Creating high-quality, transparent images requires precision, especially for complex subjects. If you need consistent, professional results, working with experienced image editors can save time and protect your brand presentation.