A clipping mask in InDesign lets you place an image inside a custom shape so only the visible area inside the frame appears. This is one of the most useful techniques for creating professional layouts, text effects, and creative image compositions.
In this step-by-step guide, you’ll learn how to create clipping masks in InDesign using frame tools, custom shapes, and even text. Whether you’re designing for print or digital, this technique helps you control exactly how images appear in your layout.
Quick Answer: How to Create a Clipping Mask in InDesign
To create a clipping mask in InDesign, draw a frame shape using the Frame Tool, place an image inside it using File → Place, then adjust the image within the frame using the Selection Tool. The frame acts as a mask, showing only the area inside the shape.
Tip: InDesign uses frames as masks by default, so placing an image inside a shape automatically creates a clipping mask effect and controls which parts of the image remain visible.
What is a Clipping Mask?
A clipping mask is a design technique that controls which parts of an image or object remain visible based on the shape of another object. It lets you hide unwanted areas while keeping the rest of the image intact, making it a non-destructive editing method.
Clipping masks are used to crop images into shapes, create text image effects, apply creative layouts, and combine multiple elements into a clean composition.
In Adobe InDesign, clipping masks work through image frames. Instead of using a separate masking command like Photoshop, placing an image inside a frame automatically limits the visible area to the shape of that frame.
What is InDesign?
Adobe InDesign is a professional desktop publishing and layout design software developed by Adobe Systems. It is widely used in the design industry for creating print and digital media, such as magazines, newspapers, brochures, posters, eBooks, interactive PDFs, and more. InDesign provides robust tools and features specifically designed for layout design, typesetting, and graphic design.
Step-by-Step: How to Create a Clipping Mask in InDesign
In InDesign, most objects are contained within frames. Interestingly, these frames are inherent clipping masks. Since the structure and its content can be moved independently, InDesign includes this basic masking functionality as a core feature.
To create a clipping mask in InDesign, you can start by designing a vector shape and inserting your desired image into that shape. By utilizing a vector shape in InDesign, you can designate it as the clipping mask for your image, replacing the default rectangle. This straightforward process remains consistent for any vector shape you choose within InDesign.
A. Clipping Masks Using the Frame Tool
Step 1 – Launch Adobe InDesign
Launch Adobe InDesign and open your document or create a new one. Place the image or graphic you want to use into your document by going to “File” > “Place” and selecting the file from your computer.
Step 2 – Transform Tool

You can select the central circle on the image and move it accordingly to reposition the images within the frame. The Transform Tool can also trim or clip the image edges if necessary.
Step 3 – Frame Shape Tool

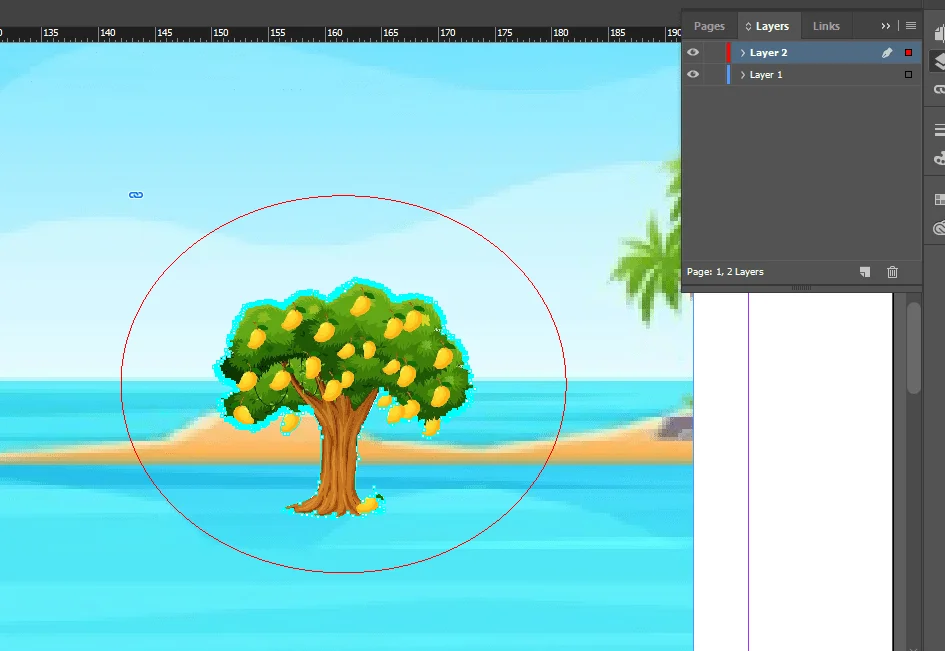
Select the Rectangle Frame Tool (or any other frame shape tool you prefer) from the Tools panel on the left. Select the Ellipse Frame Tool from the toolbar in InDesign.
Step 4 – Create A Frame Shape

Click and drag on your document to create a frame shape. This shape will define the visible area of the image.
Step 5 – Clip Within the Frame

With the frame selected, go to “File” > “Place” and choose the image you want to clip within the frame.
Step 6 – Adjust The Image Placement and Size
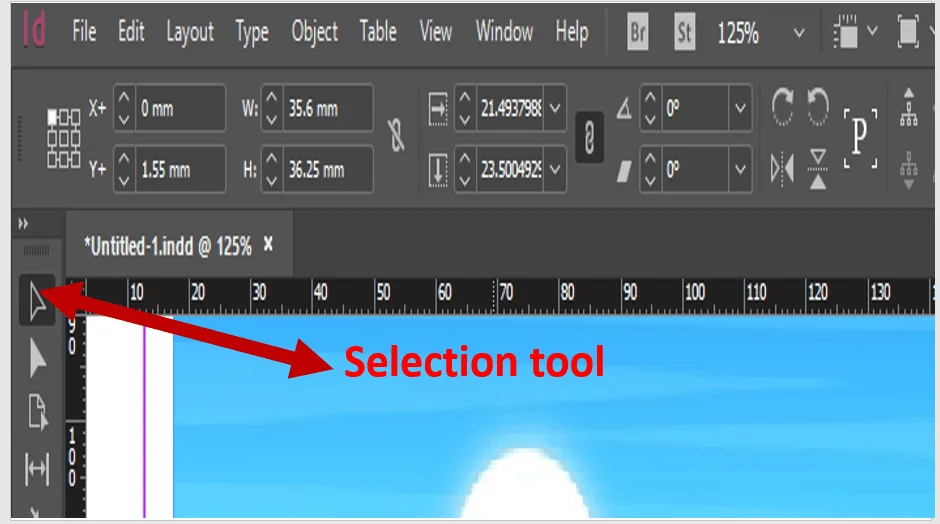
Position and resize the image within the frame as desired. You can use the Selection Tool (black arrow) to adjust the image placement and size.
Step 7 – Layer Order
Make sure the image is positioned below the frame in the layer order. To do this, go to “Object” > “Arrange” > “Send to Back.”
Step 8 – The Frame Acts as the Clipping Mask
Once the image is placed inside the frame, the frame automatically works as a clipping mask. You don’t need to apply a separate masking command — simply resize or reshape the frame to control which parts of the image are visible.
Step 9 – Adjust or Reposition the Frame Shape
The frame shape now acts as a mask, clipping the image within its boundaries. You can adjust or reposition the frame shape, and the image will update accordingly within the clipping area.
B. Clipping Mask Using Customized Frame Shapes in InDesign
To create an InDesign clipping mask vector using customized frame shapes in InDesign, you can follow these steps:
Step 1 – Open Adobe InDesign
Open Adobe InDesign and open your document or create a new one.
Step 2 – Select The Pen Tool
Select the Pen Tool or any other shape tool you prefer from the Tools panel on the left.
Step 3 – Draw The Customized Shape
Draw the customized shape on your document by clicking and dragging to create anchor points and shape segments. Customize the shape to your desired form.
Step 4 – Selection Tool
Select the Selection Tool (black arrow) from the Tools panel once the shape is created.
Step 5 – Created A Shape
To proceed, we need to place the image inside our newly created shape to use it as a clipping mask. With the Selection Tool active, click on the image to select it. Then, remove it by cutting it (Edit > Cut).
Place the image you want to clip within the customized shape by going to “File” > “Place” and selecting the image file from your computer.
Step 6 – Use The Selection Tool
Position and resize the image within the customized shape as desired. Use the Selection Tool to adjust the image’s placement and size.
Step 7 – Customized Shape in the Layer Order
Ensure the image is positioned below the customized shape in the layer order. To do this, go to “Object” > “Arrange” > “Send to Back.”
Step 8 – The Frame Acts as the Clipping Mask
Once the image is placed inside the frame, the frame automatically works as a clipping mask. You don’t need to apply a separate masking command — resize or reshape the frame to control which parts of the image are visible.
Step 9 – Adjust or Reposition the Shape
The customized shape now serves as a clipping mask, and the image is clipped within its boundaries. You can adjust or reposition the shape, and the image will update accordingly within the clipping area.
C. Clipping Mask Using Typeface in InDesign
Step 1 – Using Text Tool
There are several applications for creating masks using shape tools. However, using the Pen Tool to trace over typography would take a lot of time. Fortunately, there is a useful tool that can convert fonts into layer masks. Create a type first by using the Text Tool. Select your typeface and font size before placing your content.

Step 2 – Create Outlines
Using the Selection Tool, now pick the text frame. Then select Create Outlines under Type.

Step 3 – Edit and Paste
We can insert a picture into this frame now that the contours have been made. Cut the image, then choose the written outline to accomplish this. Next, select Edit > Paste into.
Step 4 – Adjust The Position
Now, you have the freedom to adjust the position of your image according to your requirements.
Final Thoughts
Learning clipping masks is essential. And if you know the proper procedures, you can create exciting designs. However, it requires patience to bring perfection to the editing. So, practice more and more to achieve the desired standard.
If you need perfectly isolated images for print layouts, product catalogs, or marketing materials, professional clipping path service from Clipping World ensures clean, accurate cutouts ready for InDesign, Photoshop, and other design software.
Frequently Asked Questions
To create a clipping mask in InDesign, draw a frame shape using the Frame Tool, place an image inside it using File → Place, and adjust the image with the Selection Tool. The frame automatically acts as a mask, showing only the area inside the shape.
InDesign does not use a separate “clipping mask” command like Photoshop. Instead, it uses frames as masks. Placing an image inside a frame automatically creates the masking effect.
To mask an image in InDesign, create a frame using a shape tool, place your image into that frame, and reposition it as needed. Only the portion of the image inside the frame remains visible.
InDesign doesn’t have a dedicated clipping mask shortcut. However, you can quickly place an image into a frame using Ctrl + D (Windows) or Command + D (Mac) to import your image into the selected frame.
Cropping permanently trims part of an image, while a clipping mask only hides areas outside the frame. The hidden parts remain intact and can be repositioned later.
There is no separate clipping mask menu in InDesign. Frames themselves act as clipping masks, so placing an image inside any frame shape automatically creates the effect.
Yes, you can group multiple shapes together and use them as a single frame. When an image is placed inside the grouped shapes, it will only appear within the visible areas of the combined shape.